Best Arduino Projects for beginners make Arduino Maze game
Today i will show one of new and best Arduino projects, i.e Arduino Maze game from scratch to end, This can be best science project idea or best project for mini engineering and this can be called as Top arduino projects for 2021.
How Arduino Maze game works?
Here the movements of maze board are purely controlled by arduino joystick module, this multi axis module is pretty much similar to joystick control buttons, when the stick is moved up whole maze board moves up, when thumbstick is moved down board moved down similarly controls are for left and right movements
So we will begin to make this exciting arduino project, starting by materials required to make this project
Supplies for Arduino maze game
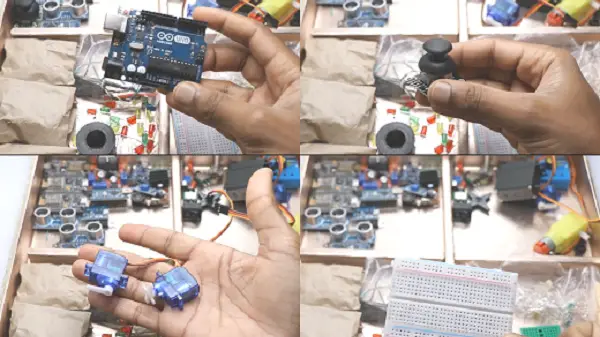
- Arduino Uno alternatively Arduino Nano can be used
- Joystick module for arduino, Micro servo two pieces
- Bread board small version is better which is shown in image which got separate power rails
- Jumper wires for making Circuit connections and DC power source
| Name of component | Buy in India | Buy in USA |
| Arduino Uno | https://amzn.to/3kbjZL2 | https://amzn.to/3buKSoW |
| Micro Servo | https://amzn.to/3uj9fyH | https://amzn.to/3pF5i3Y |
| Joystick Module | https://amzn.to/2NszMsD | https://amzn.to/3aHhbCd |
| Breadboard and jumper wires | https://amzn.to/3qHY406 | https://amzn.to/2OPKmu6 |
Disclosure: These are affiliate links. As an Amazon Associate I earn some credits from qualifying purchases.
Once we gather all the above mentioned supplies Circuit can be made, Please refer circuit diagram provided below
Circuit diagram for Arduino game
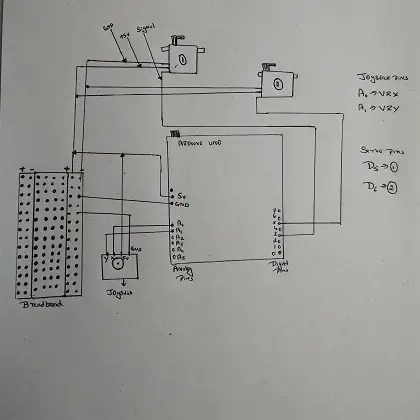
Circuit Diagram Explanation
While many will understanding by simply looking at the diagram but not everyone are pro like others, well this indepth explanation is for begineers!
Joystick module has 4 pins
Gnd will go to negative rail in breadboard, +5v for positive power rail on breadboard
Vrx to A0 pin of Uno while Vry to A1 pin of Uno board
Micro servo connections
For easy understanding i renamed servos as servo 1 and servo 2
Servo number 1 should be the base servo responsible for forward and backward movements
Servo 2 is for right side and left side movements
Servos has 3 pins as all know that!
Signal pin will be connected to D3 of Uno incase of servo 1, where as servo 2 will go with D5 of Uno, while positive and Gnd should be connected to + and – power rails in Breadboard
Arduino Power supply to breadboard
To distribute power supply to breadboard from Uno connect Gnd pin of Uno to negative power rail of breadboard and +5v Pin to positive power rail in breadboard
Note: You can use other digital pins also, make sure you enter same pin number in Arduino code
Once all the circuit connection is made, Upload the code and test if everything is working fine, here the project wont work from usb power supply from board as a result preferred to use external DC power supply
Code for Arduino Maze Game Project
Once the power is supplied to arduino board slightly move the joystick when u move it upwards servo 1 should respond when u move it left/right servo 2 should make movements, if u have reverse response try changing pins of servos, Once components are working perfectly frame is necessary to put all these up
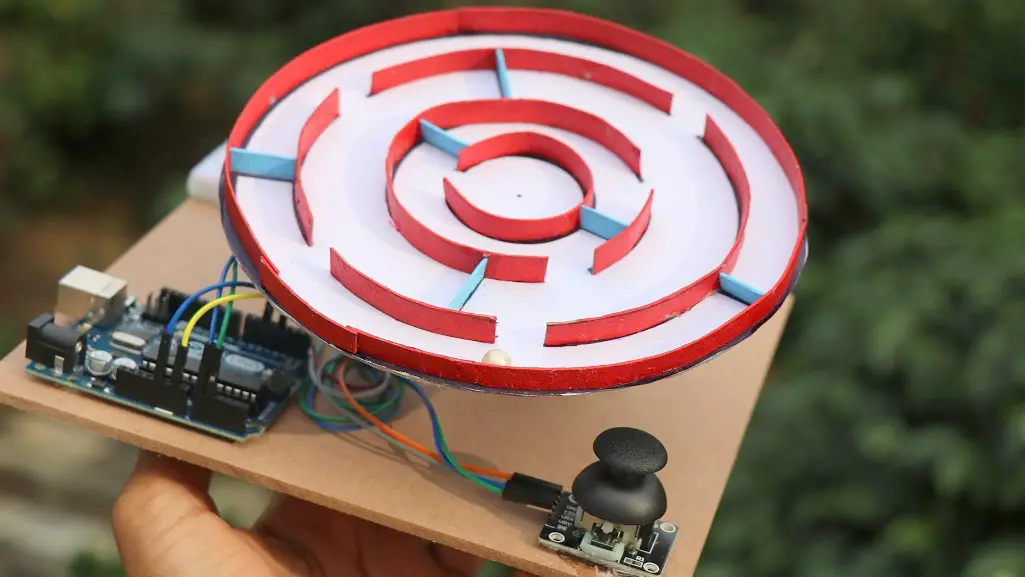
Building Maze
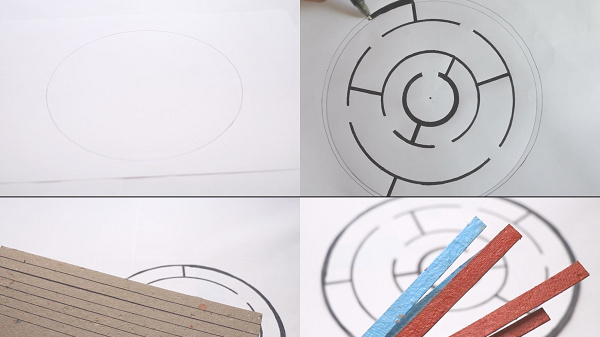
To build maze i use few pieces of cardboard and paper, its very easy to make
Draw Circle on a sheet of paper then Draw mazes as per your requirements, More the maze more tough the game will be
Circular piece of cardboard as per paper size Stick maze drawn on paper to cardboard
Allow it to dry, Meanwhile cut strips of cardboard and color it accordingly Cut and colored strips are stick on lines of maze
I used superglue to stick those strips Once Dry we can move further
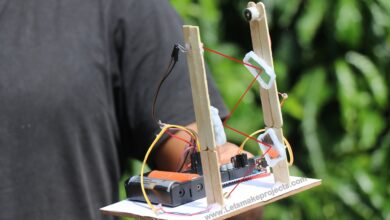
Finishing Arduino game project
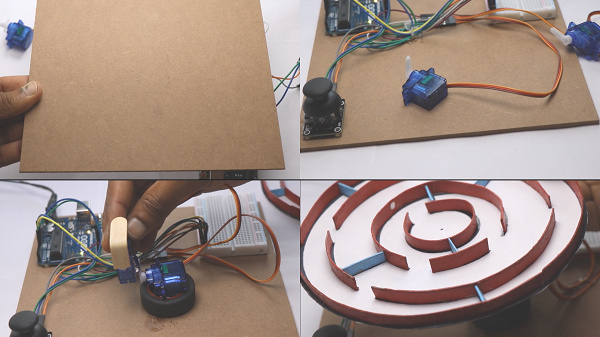
To make base support i used MDF Wood as it has space to fit in all my electronic components later Place all the components and attach to board using double sided tape
To elevate height of micro servo i used recycled wheels from old RC Car Using hot glue stick micro servo on top of wheel
Since shaft of servo is small i enlarged same with popsicle stick so that it can support entire maze board
Please follow steps as shown in image for servo attachments Hot glue center part of Maze board and attach to servo
Refer images for any confusions Once this is complete Arduino maze project is ready to roll
How To play Arduino maze game
Power Arduino uno using 6v dc adapter then Place small ball on maze board using joystick move this ball to center of board
This is Best idea for party games whoever reaches to middle first will be winner of game
Video Link for Best arduino projects
Arduino maze game project working and video tutorial Here
This was all about arduino game project this is for sure one of the best arduino projects for beginners and if you are looking for any science project or mini engineering or hobby weekend project ideas this can be the one
Like usual if you have any queries regarding this arduino game project or any suggestion for improvements let me know in the comments box below, also check out my other best arduino projects on my previous posts, Thank you and have a good day.