Arduino Walking Robot Project
Ever wondered you can make Walking robot using Arduino in very simple way? This cute robot walks front and back when some obstacle approaches it changes direction!
This article includes Arduino walking robot code and simple step by step explanation about walking robot mechanism.
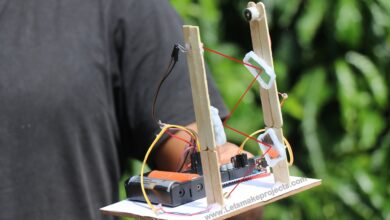
- Here is the actual image of walking robot which we are going to make using Arduino
- I have given list of all components which were used to make this project in fact this can be known as obstacle avoiding robot

Walking Robot Mechanism
Micro servo shaft is connect with legs of robot On powering Arduino nano send signals to micro servo
It starts making specific angular movements
Design of legs resemble walking Both servo works at same result as result legs move
On detection of some obstacles using ultrasonic sensor it sends signals to rear servo to stop movements
Until clear path is observe rear servo changes overall walking course of robot
Tip: You may also like our Robotic Arm from Arduino
Supplies required to make walking robot project
Arduino nano with breadboard and HC-SR04 Ultrasonic distance sensor
Plastic geared micro servo, Metal geared servos works much better
3D Printer to print body parts If you want 3d printed parts for this project let me know in comments
After gathering all these parts lets start with legs
Buy Components
Disclosure: These are affiliate links. As an Amazon Associate I earn from qualifying purchases.
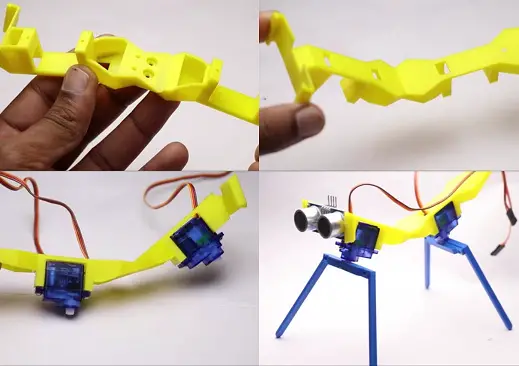
Robot leg assembly
3D printed parts are design considering easy to assemble concept Servo horns are connect to 3d printed horn holder
Use screws to connect them together Prepare other leg followed by same instructions

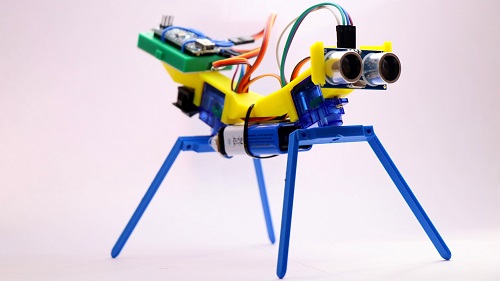
Yellow colored parts shown in visuals are main body which holds all electronics
Micro servo are joint on Micro servo placement slots Screwed to frame to avoid breakdown while working
Wires are well organize by usage of dedicated slots provided on frame Connect legs to servo shaft
Ultrasonic distance sensor is attach as shown in visuals above this will be completion of electronic hardware placements
Later make Circuit please follow circuit diagram below to make circuit
Arduino servo walking robot circuit diagram
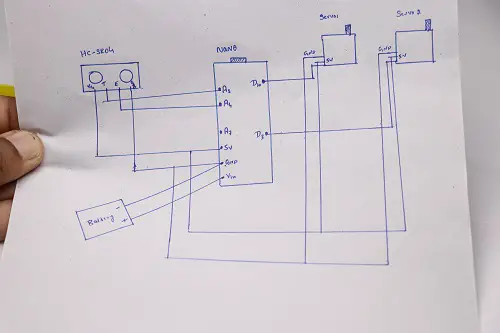
Circuit is very easy to make simply connect trig and echo pins to A3 and A4 pins, servo signal pins go with D3 and D10 pins of Nano
External power supply will be used to power this project make sure that you are not trying hard to power this USB as it will never work!
Instead of PCB i used pieces of wire to make connections which can be seen in below visuals
Arduino walking robot code
Open Arduino ide and paste this followed by uploading to board if you wish change the pins and servo delay time but if you are beginner to this don’t make any changes in code which later might result in faulty working!
Final steps for robot
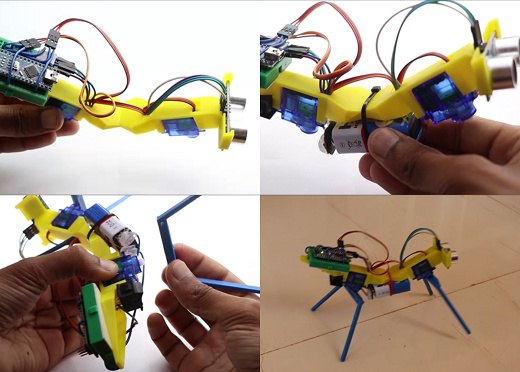
As mentioned earlier usage of cut piece wires instead of jumper reduces wire count
I used 9v battery along with switch so that it can be turn on and off whenever necessary
If you are using other parts not mention here weight consideration should be taken into account
As per my calculations i added battery to mid point of frame for balanced and effective working
After battery is in place firm it using zip ties Finally add legs
Test project by switching on keeping in ground later check for obstacle avoidance working keeping hand in front of ultrasonic sensor
I recommend to use rechargeable batteries if you plan to use this project on long run
Video tutorial of Arduino servo walking robot
Watch working video HERE i recommend you to try this as this is one of best Arduino project for beginners