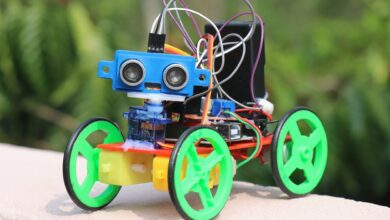
How To Make Automatic Hand Sanitizer using Arduino
Hello creators, well i know many have been waiting for this project, finally i will be showing you How to make automatic hand sanitizer using Arduino.
As i have already made video tutorial on How to make touchless hand wash dispenser using arduino nano, after that tutorial many asked me to make same project using arduino Uno
Here i will show u Both ways, Make sure to check out video which is provided at End of this article
1)How to make Automatic hand sanitizer machine using Arduino Uno

2)How to make automatic hand sanitizer machine using arduino nano

Well both of these automatic hand sanitizer dispenser follows almost same mechanism, Here the purpose of using arduino nano and arduino uno is many enthusiast either have ARDUINO UNO but not ARDUINO NANO or in other way round!
Materials required for Arduino Hand wash Dispenser
- Empty sanitizer bottle
- Arduino Uno, Ultrasonic sensor HC-SR and Micro servo
- Jumper wires, MDF Wood, Hot glue and Pieces of wire
- Arduino IDE and Cable to upload program
| Name | Buy in India | Buy in USA |
| Arduino UNO | https://amzn.to/34p2VKk | https://amzn.to/3buKSoW |
| Micro Servo | https://amzn.to/3oXfUfR | https://amzn.to/3pF5i3Y |
| Ultrasonic sensor | https://amzn.to/3fP8jvv | https://amzn.to/2NjCLUw |
| Jumper wires and Breadboard | https://amzn.to/3fIDCYI | https://amzn.to/2OPKmu6 |
Disclosure: These are affiliate links. As an Amazon Associate I earn some credits from qualifying purchases at no extra cost for you.

It is easy to work on empty sanitizer bottle, if bottle filled with liquid is use it might spill while on working phase
Once all the supplies are gather we can move on to circuit making part
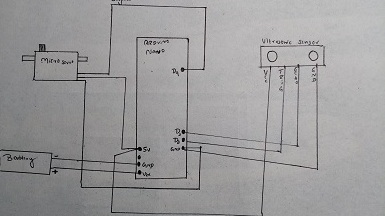
Here we don’t need breadboard since we are using only 2 Arduino modules, hence 2 Gnd ports along with 2 power ports are provided in Arduino Uno board
Automatic Hand Sanitizer Circuit Diagram
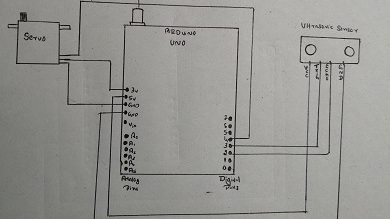
Circuit diagram explanation
Here only digital pins will be used to make this Arduino project
D4 pin of Arduino Uno is connected to signal pin of micro servo, D3 will go for Trig pin of HC-SRO4/ Ultrasonic sensor
D2 is for Echo pin, Vcc and Gnd of sensor to +5v pin and Gnd pins
Micro servo Gnd to Gnd of Uno, Positive wire to 3v pin of Uno, Once all the wiring finishes, Upload code to uno using IDE
Steps for uploading code already given in detail on my previous projects, u can refer arduino projects section
Arduino Code for Touchless Dispenser
Once u upload the code half of work is done, Test out if arduino code and circuit is working fine by connecting it to power supply, Once its confirmed, let’s build mechanism
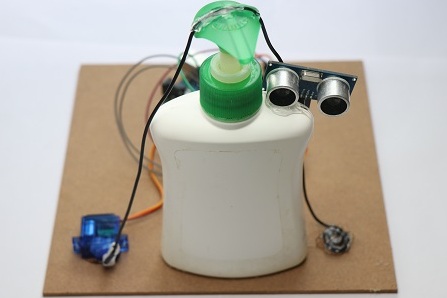
Place the assembled circuit on MDF wood
Alternatively piece of cardboard or 3D Printed body for much more appealing look, Using Hot glue stick base of hand wash container to wood base I will be using piece of wire for pulling mechanism
Adjust servo shaft for initial position Hot glue micro servo to wood board At first use super glue later followed by hot glue for improved strength
Reason of using plastic geared servo is push function is smooth in my type of container, it depends of container manufacturers
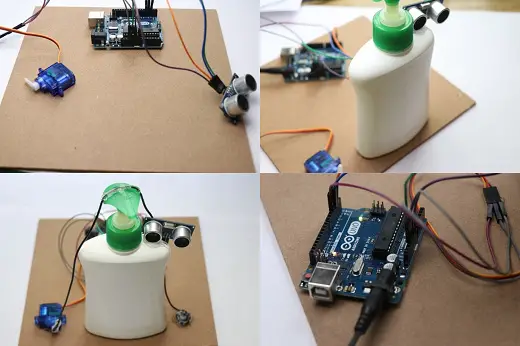
Make all connections referring images above
Allow hot glue to dry completely, make small tests by pushing sanitizer button down a few times
Power board using external supply, I used 6v adapter to power this project
How it works?
Connect power to Board, wave your hand or just bring your hand closer to ultrasonic sensor
Ultrasonic sensor sends signals to board which later is sent to micro servo
Not only hand objects but are detected and responded, it even responds to object which is an obstacle for signal transferred
Micro servo rotates at some angle
This rotation causes shaft movement which in turn pulls the wire that is connected to hand wash pushing part. As a result hand wash/sanitizer comes out
Time of response along with distance at which ultrasonic sensor should detect obstacles can be altered in code
I have added instructions in code on how to alter
That was all about automatic hand sanitizer project using ARDUINO UNO, Now we will make same arduino projects using ARDUINO NANO
Materials Required
All the materials remain same for this project except here only major change being ARDUINO NANO and Breadboard used
Contactless hand sanitizer Circuit Diagram
Please follow the diagram above to make circuit connections
Once the circuit built as shown in image upload code to board using Arduino IDE
Copy and paste the code later change any parameters if you want and later upload
Code for hand sanitizer project
After the code gets upload to board, Make few trials to check if everything works fine, Once everything built it’s difficult to check for error points
Mechanism For this Arduino project using nano

Steps
Using Hot glue stick servo to Sanitizer bottle body later Make 2 holes as shown in image
Insert piece of wire into these holes End of these wire will be connected to micro servo shaft
Once this is complete using hot glue attach HC-SR04 To one side as in image
You can keep it on other places too, since my place is effective kept over in position
I coupled rest of components to back side using hot glue, it was easy as everything was in breadboard Later supply power
I prefer to use rechargeable batteries later Pre-check if mechanism is working, once it is confirmed Fill your container with soap/sanitizer then Power it up
Bring your hand close to sensor, use the dispensed liquid effectively and stay healthy!
Video link For automatic Arduino dispenser
Watch video tutorial Here
Advantages from both projects
- Easy to make Arduino projects
- Inexpensive contactless dispenser
- Creative project for science fair
Disadvantages
No disadvantages!
That was all about these Arduino projects, Hope you enjoyed the idea, if you have any queries let me know in the comments box, Suggestion for improvements are always welcome.