Arduino Automatic Hand Dryer

Ever wondered how to make automatic hand dryer using Arduino? this is not complex project as it seems, you can make this project for upcoming science fair or for mini project as this is top Arduino project idea for beginners

Automatic hand dryer using Arduino Working principle
There is no rocket science behing working of these simple hand dryers, just few simple conecpts come into picture here, for easy understanding i have put them in points below
- DC Fan also called PC fan works as exhaust in our computer CPUs these are used for blowing air to our hands
- Arduino automates the work process
- To make this process automatic or touch less HC-SR04 was used some also call this as ultrasonic distance sensors, Relays used for proper maintenance of DC Power supply
- All these components put up together makes our touch-less hand dryer machine to function
Supplies required
Arduino UNO Kit from Here
Ultrasonic Sensor
PC FAN best buy
Disclosure: These are affiliate links. As an Amazon Associate, I earn some credits from qualifying purchases at no extra cost to you.
How to use Arduino hand dryer
Here DC power from rechargeable batteries powers our hand dryer
Plug into points Get your hand close to sensor Air starts blowing
These project is much suitable for use in washrooms to dry hands
Since everything is touch less it encourages hygiene hence you have a point to try and share this project!
Supplies required
- If you don’t have any of these components you can check my previous post for buying link for these materials
- Arduino Uno is reliable for this project
- HC SR04 or ultrasonic distance sensor
- DC Fans aka PC Fans aka CPU Fans i used 2 of them as it blows sufficient amount of air
- Relay and Few wooden supports and zip ties
- Jumper wires and DC male and female pins
- Rechargeable battery and Arduino IDE
At first i would recommend you to upload the code to board and later continue with making circuit connections as it makes the work much easier.
Arduino hand dryer project code
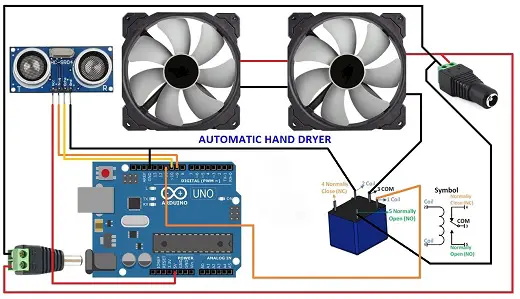
Download this code and paste to your IDE and later watch your Uno doing some magic, meanwhile as your code gets upload start making connections from the visual of circuit diagram given below but before that we have some mods to be made to our PC Fan
Preparing PC Fan for dryer
Keep pc fan side to side and use pieces of wood to add space between them
Use zip ties to firm them in place , Size of wooden piece which was use shown below

After the frame gets set add Ultrasonic sensor between those space as shown
After this step start building wire connection between electronic components

Automatic hand dryer using Arduino circuit diagram

Follow the circuit diagram for this arduino project, after you make exact same connections and above steps your project will look like this and it should!

After this stage it is time to test out our hard work by providing power supply!
Well it will work perfectly fine
Make sure you keep this in elevated place, keeping in low level place triggers ultrasonic sensor
well you can change the distance at which fans should respond in code
When above criteria’s are met we are good to go
Just plug in Keep your hands below sensor then Get some air !
How to make Automatic hand dryer using Arduino Video link
Watch complete video tutorial on how to make this cool arduino project HERE
Hope as always you seemed this project useful and interesting, if yes please show your support by sharing this valuable information to rest of world!
Also you are missing out lots of amazing projects if you didn’t check out our recent ARDUINO PET FEEDER Project.


