Arduino Realtime LPG Leakage Detection System
Arduino RealTime LPG Leakage Detection project with full project report and step by step Instructions.
If you are willing to make a useful prototype for engineering project then you can consider building this project.
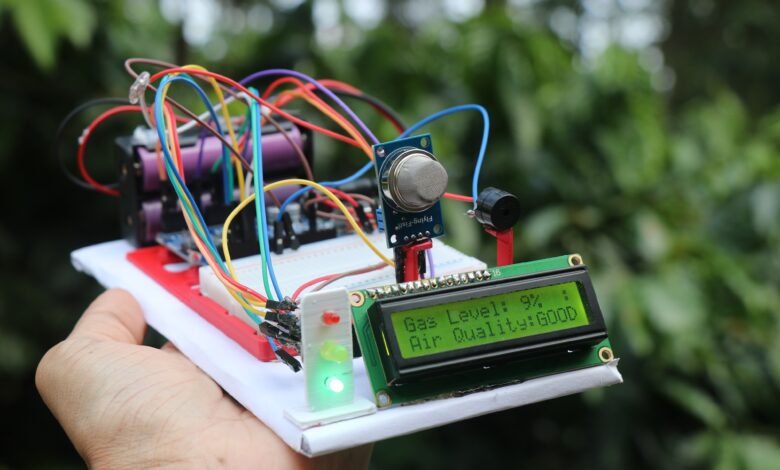
This is an arduino powered gas leakage alert device that uses gas sensor and LCD to show the values.
Here i will be using buzzer as well as 3 different color leds to show the leakage intensity.
Medium low and high levels are shown using the LED as well as the LCD display.
You can make this easily if you follow this instruction on this article, also the circuit diagram and arduino program is also included.
Complete video of this project is here
Materials to make arduino lpg leakage detection system
- Arduino uno
- MQ2 Sensor
- 3 Led
- Buzzer
- LCD with I2c
- Jumper Cables
- Breadboard
- Cardboard to organize all the electronics
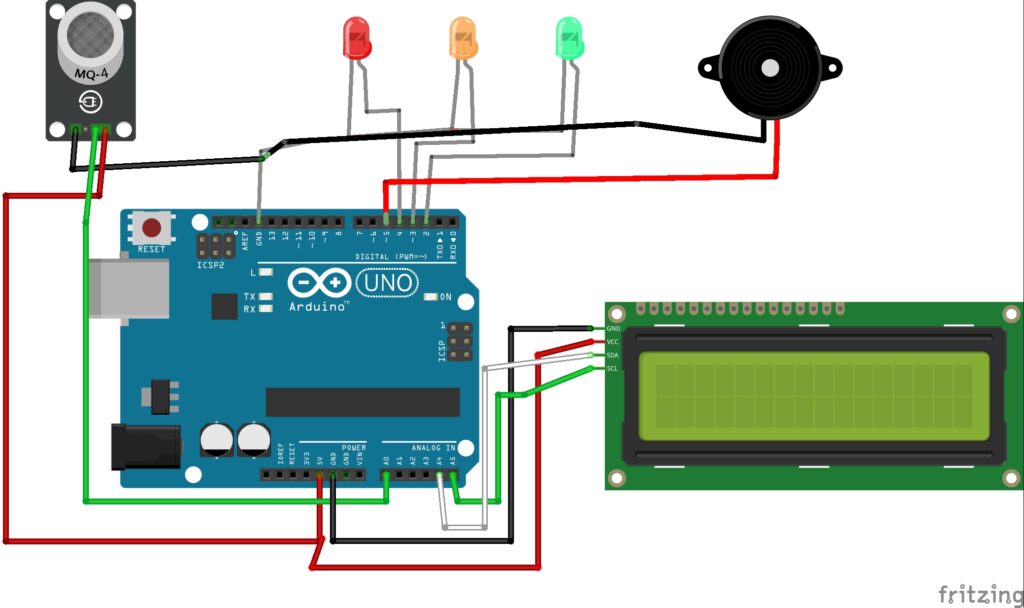
Arduino LPG Leakage Detection Project Circuit Diagram
This is the circuit that we will be using for this project.
MQ2 gas sensor has 4 pins and we are using 3 pins here, Vcc and ground are connecto 5v and ground of uno board.
Signal or the analog(A0) pin is connected to A0.
Ground from all the led is connect to gnd on Uno and the positive leg is connect to 2,3 and 4 on the digital pin.
Here we are arranging the led from levels of low to high.
Ground from buzzer is connect to ground and the other pin is connect to D5 of Uno.
LCD Display with I2 Connections with Arduino Uno
Scl and Sda pins from LCD is connect to A5 and A4 pin on the Uno board.
Vcc and Gnd goes with 5v and ground pins of the Uno.
After these connections are complete connect your Uno to computer and open Arduino IDE.
Arduino LPG Leakage Detection Project Code
Once you have the IDE open use the program below in your IDE.
#include <Wire.h>
#include <LiquidCrystal_I2C.h>

LiquidCrystal_I2C lcd(0x27, 16, 2);  // I2C address (change if needed)

int gasSensor = A0;
int greenLED = 2;
int yellowLED = 3;
int redLED = 4;
int buzzer = 5;

int threshold1 = 250;  // 50% (Moderate gas)
int threshold2 = 400;  // 100% (Dangerous gas)

void setup() {
  pinMode(greenLED, OUTPUT);
  pinMode(yellowLED, OUTPUT);
  pinMode(redLED, OUTPUT);
  pinMode(buzzer, OUTPUT);
  pinMode(gasSensor, INPUT);

  lcd.init();
  lcd.backlight();

  lcd.setCursor(2, 0);
  lcd.print("GAS MONITOR");
  delay(1000);
  lcd.setCursor(0, 1);
  lcd.print("Initializing...");
  delay(2000);
  lcd.clear();
}

void loop() {
  int gasValue = analogRead(gasSensor);
  Serial.print("Gas Value: ");
  Serial.println(gasValue);

  lcd.setCursor(0, 0);
  lcd.print("Gas Level: ");
  lcd.print(map(gasValue, 0, 1023, 0, 100)); // display percentage
  lcd.print("%   "); // clear trailing chars

  if (gasValue < threshold1) {
    // Safe level
    digitalWrite(greenLED, HIGH);
    digitalWrite(yellowLED, LOW);
    digitalWrite(redLED, LOW);
    digitalWrite(buzzer, LOW);

    lcd.setCursor(0, 1);
    lcd.print("Air Quality:GOOD ");
    lcd.setCursor(14, 0);
    lcd.print(" :)");  // a small smile emoji style
  }
  else if (gasValue >= threshold1 && gasValue < threshold2) {
    // Moderate level
    digitalWrite(greenLED, LOW);
    digitalWrite(yellowLED, HIGH);
    digitalWrite(redLED, LOW);
    digitalWrite(buzzer, LOW);

    lcd.setCursor(0, 1);
    lcd.print("Air Quality:WARN ");
    lcd.setCursor(14, 0);
    lcd.print(" :|");
  }
  else if (gasValue >= threshold2) {
    // Dangerous level
    digitalWrite(greenLED, LOW);
    digitalWrite(yellowLED, LOW);
    digitalWrite(redLED, HIGH);

    tone(buzzer, 1000);
    delay(500);
    noTone(buzzer);

    lcd.setCursor(0, 1);
    lcd.print("!! ALERT !!");
    lcd.setCursor(14, 0);
    lcd.print("!!!");
  }

  delay(300);
}
Check for proper board type and port number and click on upload and in no time the program will be in your Uno.
Now to check if everything is working fine, you see if the lcd is showing message after you verify this check on sensor.
Gas sensor you can expose to gas from small lighter and now you should see the lcd showing gas level increasing followed by orange and red LED
You will then hear the buzzer from the buzzer.
On standby the green LED will be glowing and next if gas is leaking the orange and finally the red with alert.
Put all the electronics on a piece of board and use hot glue wherever necessary and you can set it up as i did on the starting image above
Let me know how this project came out for you, Thank you for reading.
You may also like my previous post on arduino food dispenser project.


