Arduino Based Smart Garage Door
Hello people in this project i will show you how i made this Arduino Based Smart Garage Door.
Automating things will make our life so simple and easy and being a builder i like to automate things.
There are many daily life objects that we use daily or manual basis among this door play big role.
I chose garage door because that looks so fancy and you can show it to your friends.
In short let me explain how this project works, It uses arduino uno and ir sensor controlling servo.
3d printed mechanism will raise and lower the garage door and all these will be shown on LCD display module.
Interested in wet and dry waste segregation project using arduino check this post
Full video build tutorial for this project is here
Materials to build Arduino Smart Garage Project
- Arduino Uno
- IR Sensor
- Servo
- LCD module with I2c
- Arduino IDE and programming cable
- 3D printer and slicer
After you have these materials we can head over to making the circuit.
Arduino Based Smart Garage Door Circuit Diagram
This is the circuit diagram that we will be making for our smart garage door project.
To simplify the circuit i will explain the circuit componentwise.
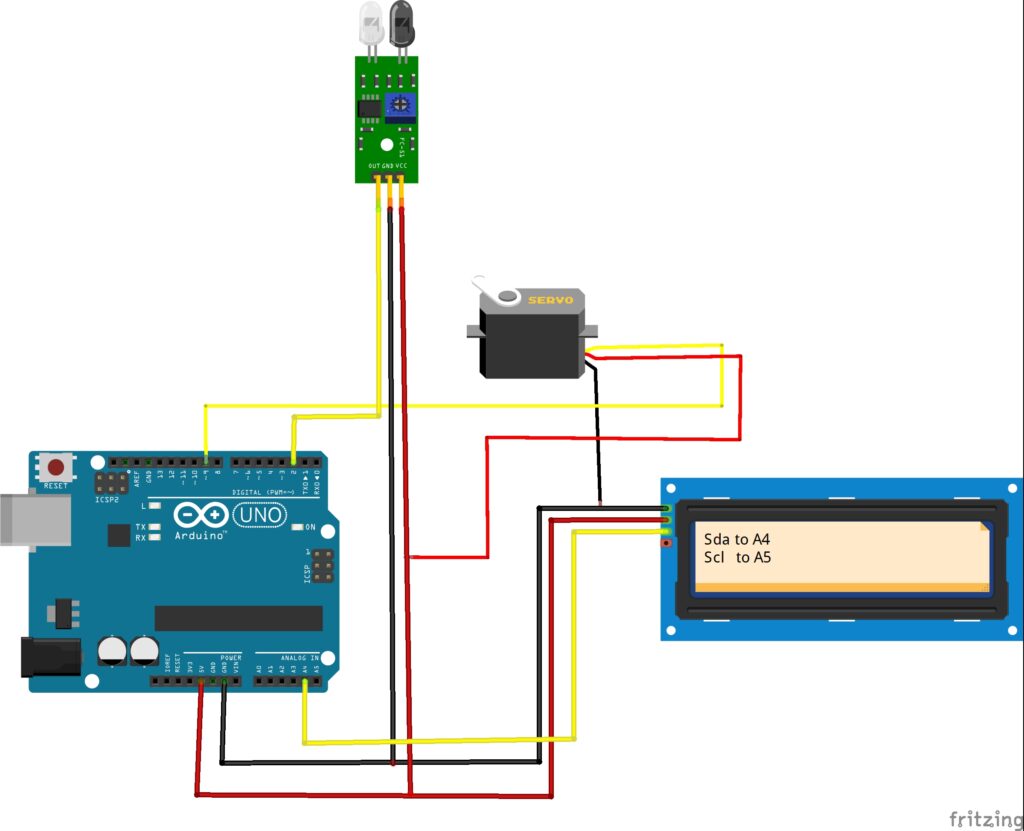
LCD module Connections
Like other lcd types these arduino lcd module has 4 pins.
Scl and Sda are connected to A5 and A4 pins and i have given same on the LCD also.
Power pins Gnd and Vcc are connected to ground and 5v on the Arduino board.
Micro Servo Connection
Micro servo has only 3 pins here the Vcc and Gnd are connected to 5volt and grpund of uno.
Signal pin from servo is connect to digital pin d9 on the Uno.
IR Sensor Connections
This has 3 pins in total and here i will connect the signal pin from sensor to D2 on the Uno board
Like the other 2 parts i will connect vcc and gnd to 5v and gnd pins respectively
Arduino Program for Smart Garage Door
After you make the connections connect the uno board to computer via ide and use this program.
#include <Wire.h>
#include <LiquidCrystal_I2C.h>
#include <Servo.h>

// ================= LCD =================
LiquidCrystal_I2C lcd(0x27, 16, 2);

// ================= SERVO =================
Servo doorServo;
const int SERVO_PIN = 9;
const int SERVO_CLOSED = 5;
const int SERVO_OPEN = 135;   // ~90% capacity

// ================= IR SENSOR =================
const int IR_PIN = 2;

// ================= SYSTEM =================
int loadProgress = 0;           // 0–100
bool authenticated = false;

// ================= TIMING =================
unsigned long lastUpdate = 0;
const int LOAD_STEP = 5;        // % increase per step
const int LOAD_INTERVAL = 200;  // ms per step
const int OPEN_DELAY = 5000;    // 5 seconds

// ================= SETUP =================
void setup() {
  pinMode(IR_PIN, INPUT);

  doorServo.attach(SERVO_PIN);
  doorServo.write(SERVO_CLOSED);

  lcd.init();
  lcd.backlight();

  showIdleScreen();
}

// ================= LOOP =================
void loop() {
  if (!authenticated) {
    handleAuthentication();
  }
}

// ================= FUNCTIONS =================

void showIdleScreen() {
  lcd.clear();
  lcd.setCursor(0, 0);
  lcd.print("Garage Locked");
  lcd.setCursor(0, 1);
  lcd.print("Hold Hand...");
}

void handleAuthentication() {
  bool handDetected = (digitalRead(IR_PIN) == LOW);

  if (handDetected) {
    if (millis() - lastUpdate > LOAD_INTERVAL) {
      lastUpdate = millis();
      loadProgress += LOAD_STEP;

      if (loadProgress > 100) loadProgress = 100;

      drawLoadingBar(loadProgress);

      if (loadProgress >= 50) {
        authenticated = true;
        accessGranted();
      }
    }
  } else {
    // Reset if hand removed
    if (loadProgress > 0) {
      loadProgress = 0;
      showIdleScreen();
    }
  }
}

void drawLoadingBar(int percent) {
  lcd.clear();
  lcd.setCursor(0, 0);
  lcd.print("Authenticating");

  lcd.setCursor(0, 1);
  lcd.print("[");

  int bars = map(percent, 0, 100, 0, 10);
  for (int i = 0; i < 10; i++) {
    if (i < bars) lcd.print("#");
    else lcd.print(" ");
  }

  lcd.print("]");
}

void accessGranted() {
  lcd.clear();
  lcd.setCursor(0, 0);
  lcd.print("Access Granted");
  lcd.setCursor(0, 1);
  lcd.print("Opening Door");

  openDoorSlow();
  delay(OPEN_DELAY);
  closeDoorSlow();

  // Reset system
  loadProgress = 0;
  authenticated = false;
  showIdleScreen();
}

void openDoorSlow() {
  for (int pos = SERVO_CLOSED; pos <= SERVO_OPEN; pos++) {
    doorServo.write(pos);
    delay(15);   // smooth & gentle
  }
}

void closeDoorSlow() {
  lcd.clear();
  lcd.setCursor(0, 0);
  lcd.print("Closing Door");

  for (int pos = SERVO_OPEN; pos >= SERVO_CLOSED; pos--) {
    doorServo.write(pos);
    delay(15);
  }
}
If you dont have libraries installed you can get liquidcrystal library here just install this first.
After you select the proper port and type of board you can press on upload and wait for few seconds.
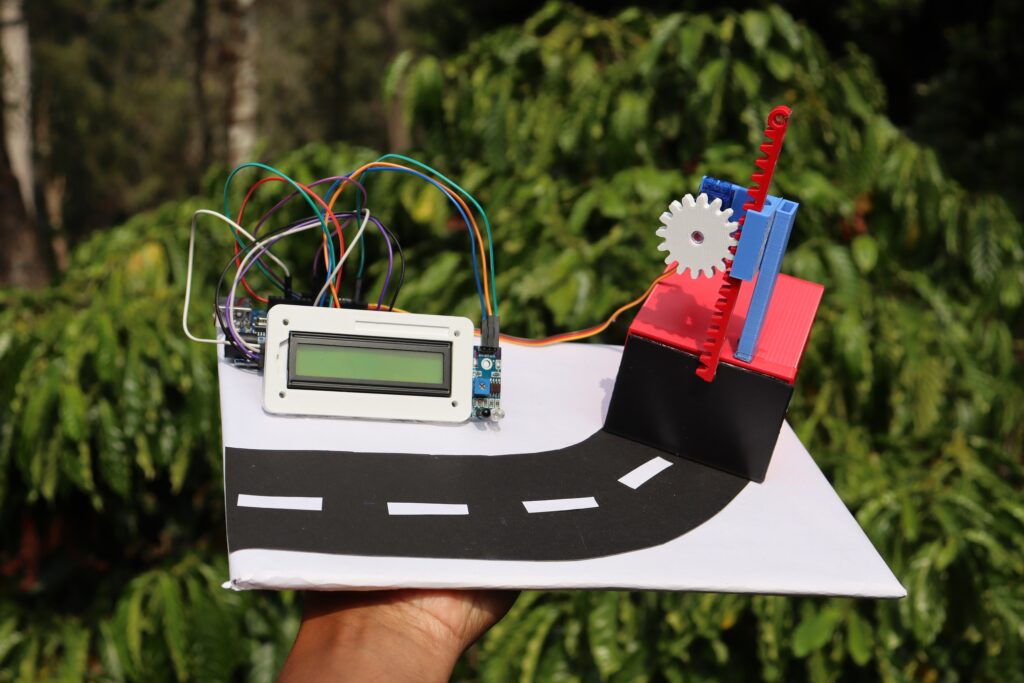
3D Printed Slider Mechanism
The door mechanism uses the gear and slider mechanism and it is 3d printed.
It consists of gear that will be attached to the shaft of the micro servo and the slider has teeth that hold gear teeth.
These two parts will be held by a frame that also holds the micro servo.
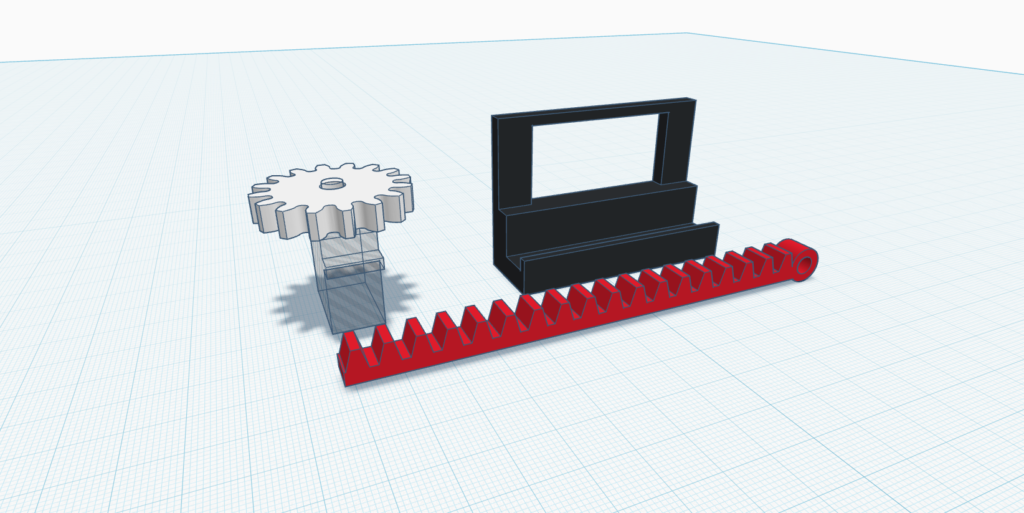
These are the parts that drives the main mechanism and as you can see the design looks cool
After these designs you can import to slice these on any slicing software i will be using ultimaker cura.
There is no need of any rafts or supports at the time of print.
3D Printed Garage Door Mechanism
To hold the main mechanism and the door mechanism i made another design also.
These design has total of 4 parts, one is the LCD holder and remaining will be the garage, door and the servo support.
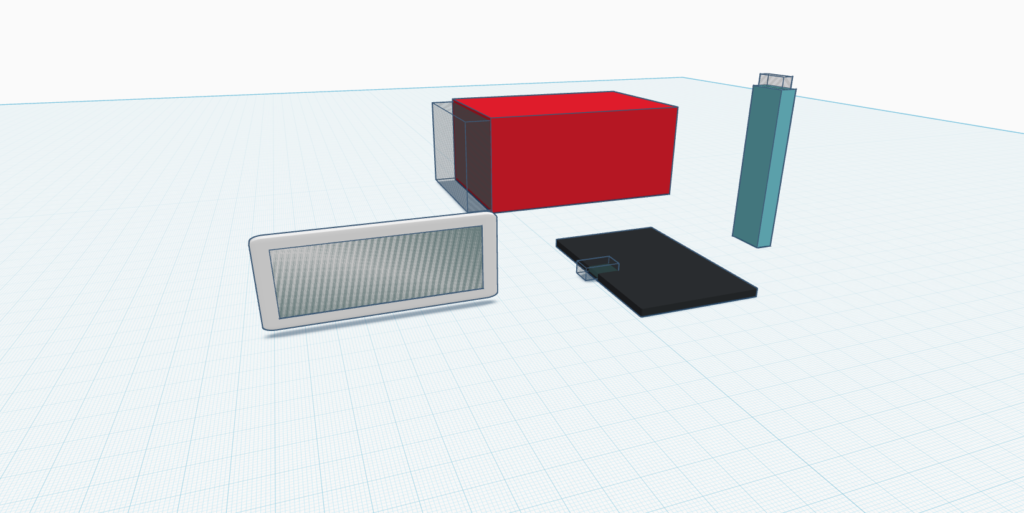
I will 3d print this with my favorite color filaments, The choice of pla filaments is left to you.
Since we have to print multiple designs it will take some time to 3d print all the parts.
To make it easier for you i have colored the design so you can print them in the same color to have the good combination of colors.
Still thinking to reduce the size of overall circuit? then i have some good news for you.
If you want to make this device more smaller you can use PCB and i would like to suggest JLCPCB
Those who don’t have a 3d printer can consider using their 3d printing services also.

Now you may ask why to use their services its because they have fast shipping with more affordable options
Now they have JLCONE application which makes everything pretty much easier.
JLCONE is a application that is available for both desktop and mobile and you can manage your orders and other services in a single platform.

Its very easy to use this and i suggest you to try it once, manage your orders and other services in one panel.
You get cool discounts on your signup, check the links below.
Now back to the project.
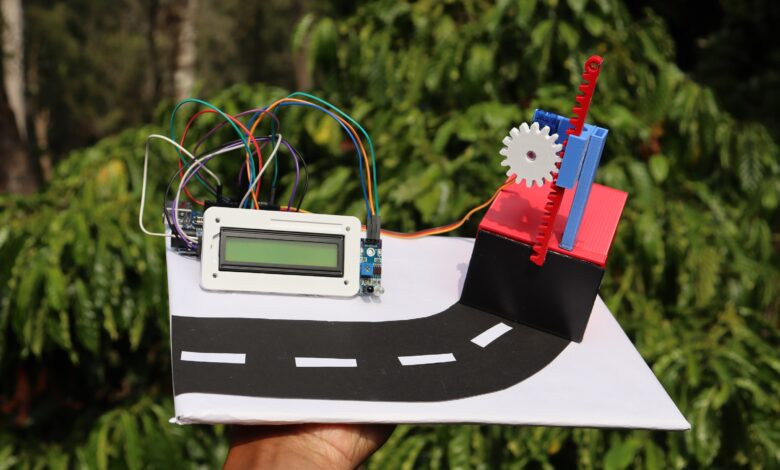
After you assemble all the components your project will look something like this.
How to use Arduino smart garage door project
All you have to do is connect uno board to computer and then you will see message on LCD screen.
Now place car or hand in front of IR sensor for 3 seconds.
Now the door slider moves up and the door opens up, now park your car inside.
Im using normal car so i have to manually place the car inside if its rc car it would be much easier!
Now the door will close automatically, Now when you keep hand in front of sensor again the door opens slowly.
Take your car out from the garage and then the car closes automatically.
This was all about this arduino smart car project, If you have suggestion for any upgrades let me know.
Consider watching this video for full build tutorial along with working video.


