Automatic Smart Street Light Using Arduino with Circuit Diagram
Hi, project makers in this post we will see how to make Automatic Smart Street Light Using Arduino.
I have given a complete project report along with a smart street light circuit and Arduino codes for the automatic street light project.
If you are seeking award winning Arduino project you should definitely try making this useful project.
Bonus: You might also like our Automatic toll collection system project.
What to Expect from the smart street light Arduino project
You are traveling on a highway at night time and you see that the street lights switch on and off, You may think the lights are defective!
No, it’s not about the streetlights, its all about the motion sensors that sense the motion of object.
This happens in 2 ways one is when there is dark automatically the light switches to on
Secondly when the vehicle/object passes by the lights are on.
What is the use of automatic street light technology
The main advantage is saving power, this technology saves a lot of power which in other ways will be a waste.
Imagine the street light turned on the whole night without even a single vehicle moving on the road
In another way, if it’s automatic the light will remain on the whole day, and both cases cause extreme waste of electricity.
How Arduino Automatic Street Light Works
The principle of working behind this project is very simple
When IR Sensor Module detects obstacle it sends a command to Arduino to activate the LED.
Also when it’s dark the LDR sends the command to Arduino to switch on the LED.
This simple mechanism is put as a model which in overall context is similar to a real project.
Materials to Build this Project
- Arduino Nano from Amazon
- LED diode(I chose blue) here
- IR Sensor
- LDR
- Jumper wires and Breadboard
- Arduino IDE and cable
- Cardboard
- Black color paper
- Hot glue
- Popsicle sticks or straw
Automatic street light using Arduino and IR sensor circuit diagram
The circuit diagram is easy since only small components are used.
In the below circuit, you can see I will use Arduino Nano which is connected to a small breadboard.
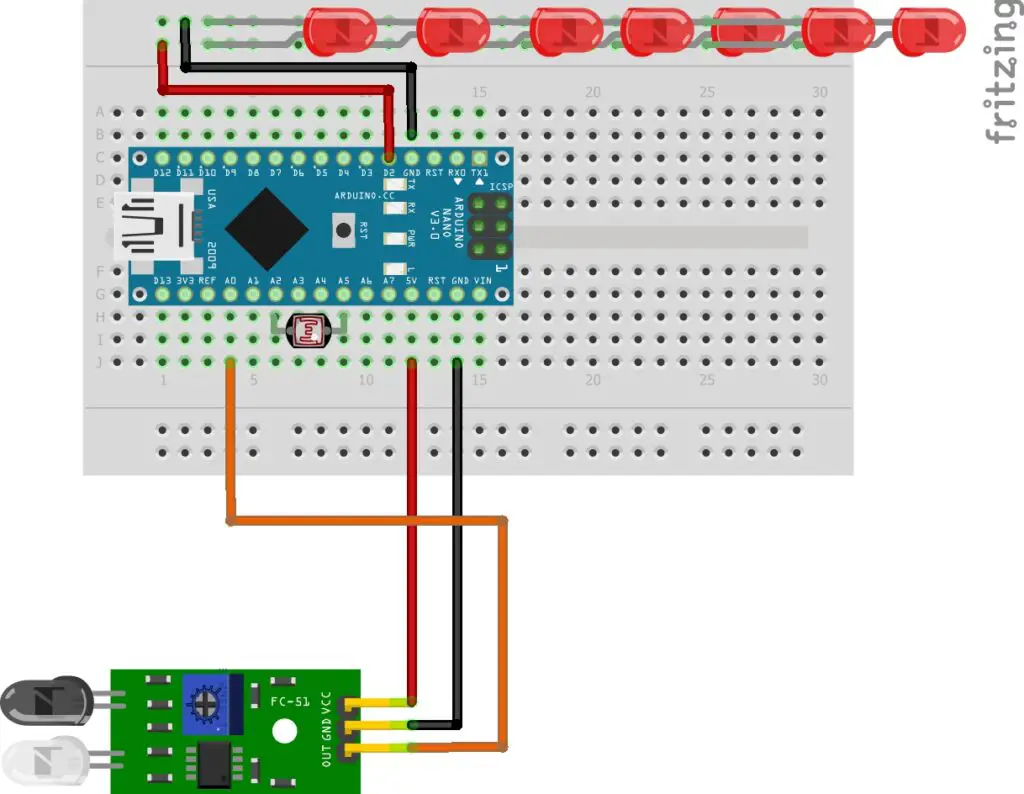
The count of LEDs that I’m using is 8 You can choose the number of LEDs depending on your project.
In the real model, I will use the parallel type of connection to join all the LEDs.
The positive pin of the LED will be connected to the D2 pin of Nano.
The IR sensor will be connected to A0 and the LDR to A5.
After this simple circuit is complete we can upload the program to Nano.
Arduino Code for Smart Street Light Project using Arduino, LDR, and IR sensor
Automatic street light project Arduino Codes are HERE
You can Copy and Paste this on your Arduino IDE.

You can understand the structure by simply visualizing the codes.
I have highlighted the delay section where you can control the LED glow time.
After you upload the code to the nano our project can be set up in a model.
Testing the Code and Circuit
If you have the connections made as per the circuit the project should work without any issue.
Connect the Nano to a USB power supply, The board powers up.
If you are placing this setup in a dark room the LED will glow.
In other way when you get your hands in front of the IR sensor the LED glows.
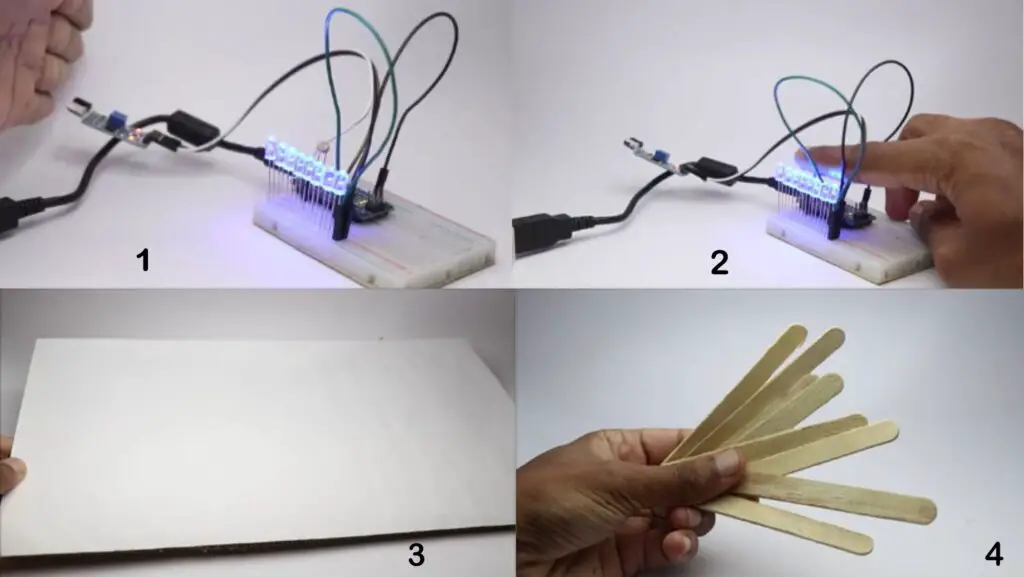
From the above visuals pointing to image 2 you can see that I have kept my hand on LDR.
This is because when there is the absence of light the LDR activates the LEDs.
I could not capture the image when I kept this model in a dark room, So this is the demo showing the working.
This completes the work, now we can set this circuit on a cardboard model.
Making the Street Light Model
You can make the street light models in many ways, I chose this method since I had popsicle sticks.
Alternatively, you can choose a Straw or a cardboard strip, the choice is yours.
I have made the 3D-printed supports for my popsicle sticks.
The part has a slot to hold the LED diode.

I have marked the Popsicle stick at a distance of 3cm from the base.
Later with scissors, I cut the marked area, I made the same with the other 7 sticks.
After this, I pulled 32 strands of copper from an old cable.
I rolled this wire to the legs of the LED, Then I inserted these LEDs into my 3D-printed holder.
As I said earlier this is optional, you can make a street light model according to your taste if not follow this.
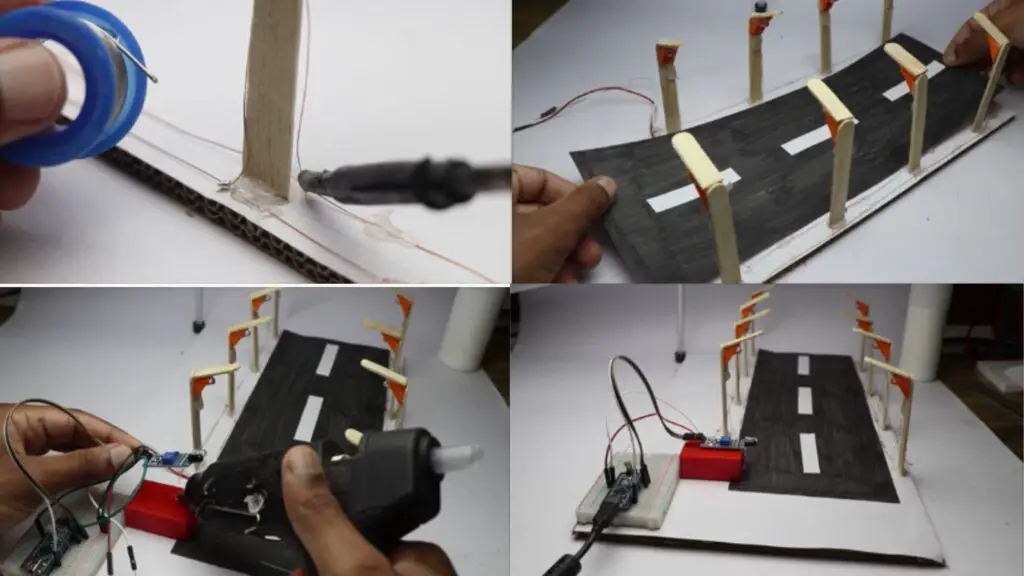
Now I have placed these 8 street light models on the cardboard, I used hot glue to stick them.
Finishing the Project
Since now we have the lamps on the cardboard, we can connect them all together.
The series method of connection does not work here, so we will use the parallel method connection.
In the parallel method, the positive of all 8 led will be connected to one wire.
All the negative legs of the LED will be connected to a single wire.
I soldered the wires and trimmed off the excess wire to make the model look tidy.
End of this step we will have only 2wires coming out of the 8 street light model.
Now add the Arduino and breadboard to the cardboard and finish adding the IR sensor.
Power the board with USB power supply, keep your hand i front of the IR sensor and now the LED should glow from all 8 street lights.
Also, try switching off the room light, and in no time your LED should be glowing, Thanks to the LDR.
If you have a small radio-controlled car this model becomes super creative, I have used a solar car check the results in the video below.
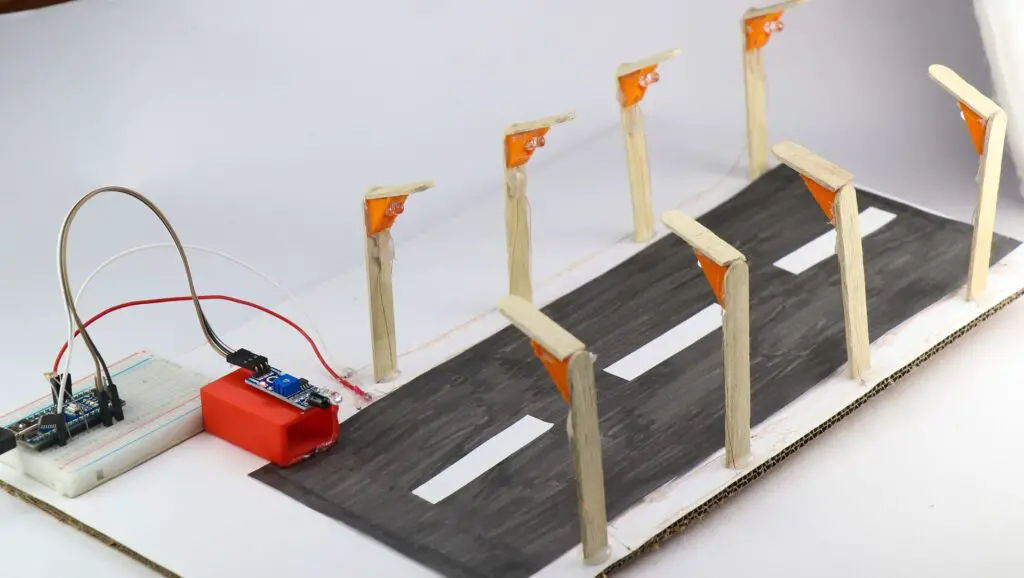
This is the image of our Arduino smart street light working model, you can make changes as you wish.
If you have any questions about building this project you can reach out via comments.
All the step-by-step instructions and a working video of Automatic Smart Street Light Using Arduino is given for better understanding don’t miss to check it out.
You can also watch a complete tutorial of this project here


can i implement this using arduino uno
Yes