Arduino Distance Measurement Project
Hola creative people, this project is about making Arduino Distance measurement using ultrasonic sensor and LCD display, this is one stop shop for all Arduino projects as it also has Arduino distance measurement code included.

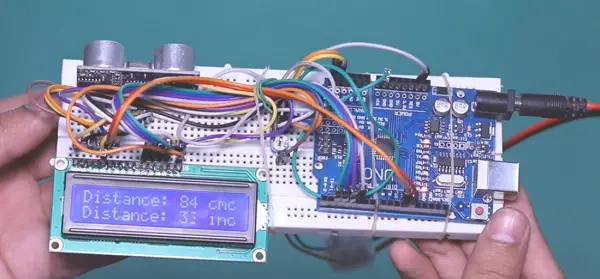
Actual image of this project given above, let me explain features of this easy Arduino project
Uses ultrasonic sensor to detect obstacle Display screen shows measured distance of object
Units are in both centimeter and inches Display screen brightness can be increased or decreased using variable resistor embedded in breadboard
Entire System is portable means you can carry it anywhere
Note: Video link for this project is provided at end of this post make sure to check it out, if you are making this project make sure you read all the points.
With all the features being said let’s head on to building this project
Material required to make Arduino Distance Measurement project
Arduino UNO, Display module( LCD Type) and Ultrasonic distance sensor aka HC-SR04
Variable resistance 103, Jumper wires and breadboard and DC Plug attached to rechargeable battery
Arduino IDE Additionally you may require rubber bands and zip ties for finishing everything
| Component | Buy in India | Buy in USA |
| Arduino UNO | https://amzn.to/3kbjZL2 | https://amzn.to/3buKSoW |
| Display Module | https://amzn.to/2ZBoC7r | https://amzn.to/3qKaZPs |
| Ultrasonic Distance Sensor | https://amzn.to/3qFwf8J | https://amzn.to/2NjCLUw |
Disclosure: These are affiliate links. As an Amazon Associate I earn some credits from qualifying purchases.
Arduino Distance measurement Code
Download and paste this code on your Arduino IDE and later upload this code to your Uno, make sure to check for port number while uploading code, Distance measurement limit can be changed in code
After uploading code disconnect USB Cable from computer and start making circuit, i have provided detailed circuit diagram below for this project
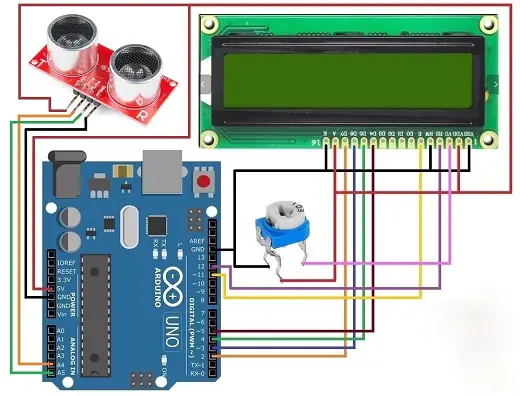
Make sure all the connections are made as per the diagram shown above, for clarity i will be giving detail explanation of circuit
LCD Display module has following pins with its functions
- GND means ground
- Vcc for 5v power supply
- Vo Display
- Rs Register
- R/W Read/write
- E Enable
- 0 and 1 are Data pins
- A Anode
- K Cathode
Display module connections
Gnd will be connect to enable and cathode along with one leg of resistor to Gnd of Arduino Uno
Vcc to anode and other leg of resistor to 5v pin of arduino,Vo to leg of resistor and Register to D12
R/W to gnd of uno and resistor while Digital pins to D2,D3,D4 and D5 Uno pins
After connections are made for Display continue with making connections to Ultrasonic sensor
Vcc and Gnd of sensor will be connect to 5v and gnd of Uno, Trig and Echo to A4 and A5 of board
Once all these are complete just connect Power supply to your board using dc pin supply to which rechargeable batteries are attached
Video link for Arduino Distance Measurement Project
Watch working of this project along with tutorials Here, also make sure to check out other projects related to raspberry pi, Arduino and other interesting projects
That was all about making this useful project using Arduino, there are lots of other Arduino project and science project ideas on this site make sure to check those projects if you or any of your friends are looking for project ideas, anyhow sharing doesn’t cost anything but less than few kbs of internet, THANK YOU and Have a good day


