Gas Leakage Detection System using Arduino
Hey guys in this article i will show you how to make gas Arduino Gas Leakage and Flame Detection With Alert System using Arduino.
This is a very useful project that you must build and can be used in practical applications also.
If you build this project you can learn a lot of things related to components and the mechanism of workings.
In this post i have given all the step by instruction and the required resources for a clean build.
Like always there is also a detailed video tutorial of the same project and you can watch it here
To Build this project you need these components.
Components to Build Gas Leakage Detection System
These are the components that you need to build this project
- Arduino Uno from amazon
- LCD module with I2c
- Flame Sensor
- MQ2 Gas Sensor
- Buzzer
- Jumper Cables
- LED – Red Color
- Cardboard
- Hot glue and superglue
- 18650 Batteries x2
- DC Pin
- Battery Holder
- Programming Cable and Arduino IDE
These are affiliate links and upon successful purchase i may receive a small commission at no extra cost to you
Arduino gas leakage detection circuit diagram
This is the circuit that is used inside this project, The circuit is not so complex as it seems.
I used MQ2 gas sensor and flame sensor to sense the flame or the gas in this project.
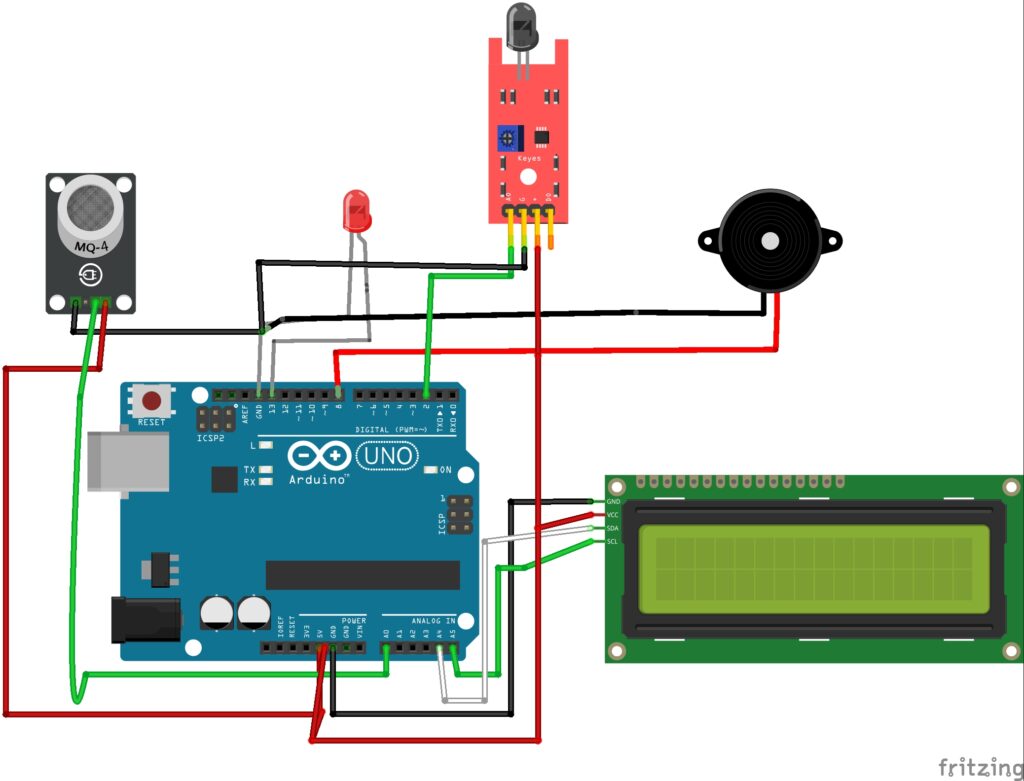
The output or the alert system is from LED and the buzzer and most importantly the LCD module.
The power pins from all the modules is connected to 5v and the GND pins of the Uno board.
Flame sensor was connected to 3.3v but this can also be connected to 5v pins.
Now the LCD module SCL is connected to A5 whereas the SDA is connected to A4.
Flame sensor signal goes to D2 whereas the gas sensor signal to A0 pin.
Buzzer to D8 and the LED pin to D13 pin and this completes the circuit.
You can take your hobby projects to next level by upgrading the parts with CNC parts from JLCCNC.
Can you believe they are offering CNC Machining at just $1? Claim the $70 welcome coupons from JLCCNC Here
They use advanced technology to produce CNC parts that can suit your various needs, So for your next project keep JLCCNC in your mind.
Fire and smoke detection system with Alarm using Arduino code
After the circuit is complete connect UNO board to computer and open your IDE.
Paste the below program, select proper port and board type and click on upload.
#include <Wire.h>
#include <LiquidCrystal_I2C.h>

#define flamePin 2
#define gasPin A0
#define buzzer 8
#define ledPin 13

LiquidCrystal_I2C lcd(0x27, 16, 2); // Change to 0x3F if needed

void setup() {
  pinMode(flamePin, INPUT);
  pinMode(buzzer, OUTPUT);
  pinMode(ledPin, OUTPUT);
  lcd.init();
  lcd.backlight();
  lcd.setCursor(0, 0);
  lcd.print("Fire & Smoke");
  lcd.setCursor(0, 1);
  lcd.print("Detector Ready");
  delay(2000);
  lcd.clear();
}

void loop() {
  int flame = digitalRead(flamePin);
  int gasValue = analogRead(gasPin);
  int gasThreshold = 300; // Adjust based on environment

  lcd.setCursor(0, 0);
  lcd.print("Flame: ");
  lcd.print(flame == LOW ? "YES " : "NO  "); // For active LOW sensors

  lcd.setCursor(0, 1);
  lcd.print("Smoke: ");
  lcd.print(gasValue > gasThreshold ? "YES " : "NO  ");

  if (flame == LOW || gasValue > gasThreshold) {
    // Danger detected
    digitalWrite(buzzer, HIGH);

    // Flash LED
    digitalWrite(ledPin, HIGH);
    delay(150);
    digitalWrite(ledPin, LOW);
    delay(150);
  }
  else {
    // Normal condition
    digitalWrite(buzzer, LOW);
    digitalWrite(ledPin, LOW);
    delay(300);
  }
}
After the program is done uploading the circuit is ready for using.
You can either test the circuit and assemble the components or do it after the assembly process.
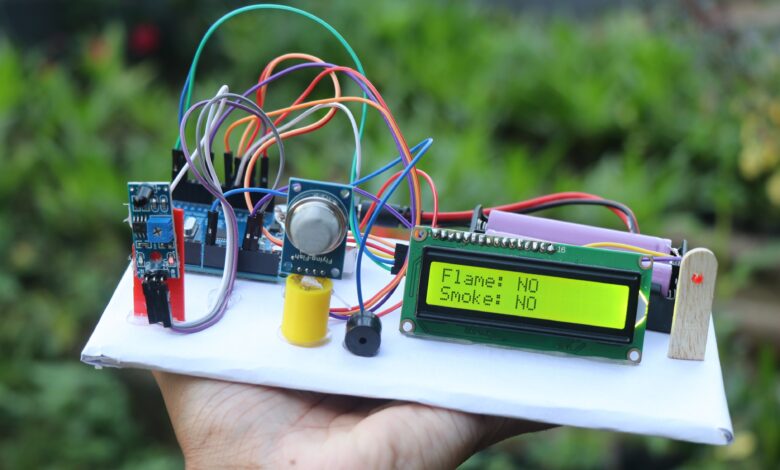
Now i will use a piece of cardboard to keep all the components.
How to use Gas Leakage Detection System using Arduino Project
I will use few 3d printed parts to keep all the components on the board.
Use hot glue to keep the parts intact on the cardboard, Now the project is ready for using.
I will use battery to power this project, Connect dc pin to the uno board.
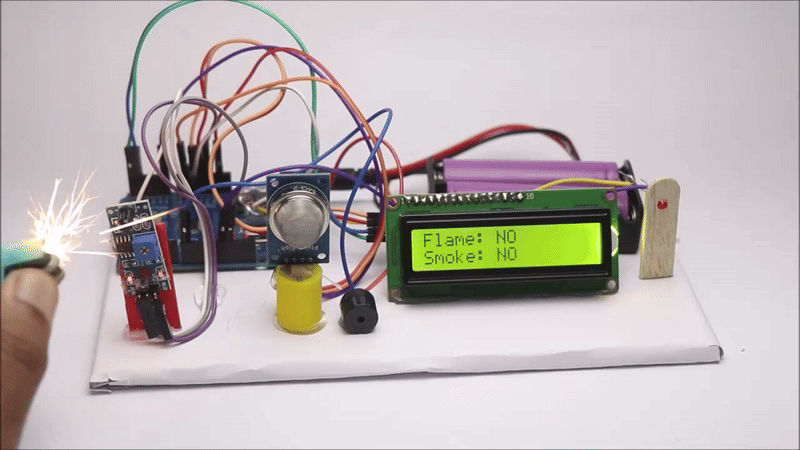
To test this all you have to do is expose the flame sensor with light or flame from lighter.
For activating the gas sensor simply i expose the gas from same lighter and as you can see the message is shown on LCD and buzzer and led also alerts.
This was all about this project, if you still have any questions ask me in the comments.
You may also like my previous post on arduino rain shield for clothes.


