Wet and Dry Waste Segregation using Arduino
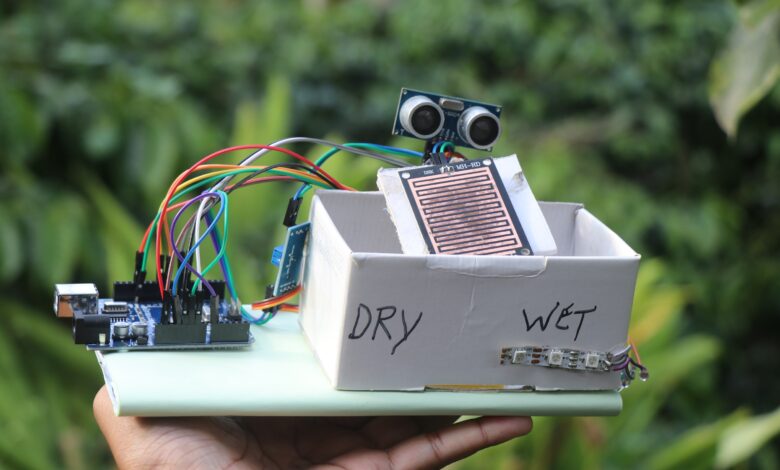
Hello friends in this project i made this wet and dry waste segregation using arduino that can seperate the dry and wet waste into 2 different bins.
Have you ever thought how the waste/garbage that goes out of the home gets segerated into wet and dry type of waste?
Nowadays most of them contribute to the garbage by segregating them manually
What about the others? do you really think the quantity of collected garbage could also be manually segregated.
Nope thats a difficult task to to, In this situation automatic dry and waste segregator becomes very useful.
Using the same concept i have built a small version of automated segregation system which i will teach you here.
This Arduino waste segregation system can seperate the wet and dry objects automatically.
I have also added a LED to indicate the colors, It shows red for dry waste and green for wet waste and on standby it displays gradient colors.
Like always you can see full project video tutorial on Jeevan Jee youtube channel.
Materials to make smart waste segregator project
These are the list of materials which you will need to make this project, keep it handy to make the build faster.
- Arduino Uno from Amazon
- Ultrasonic sensor
- Rain sensor
- Jumper cables
- Micro servo
- Cardboard
- Arduino IDE and programming cable
Kindly note that upon qualifying sales from above amazon affiliate links i may receive a small percent of sale at no additional cost to you
Dry and wet waste segregation project circuit diagram
After you have the components ready we can begin to build the circuit by connecting the electronic components.
Since we have 4 different components here i will go through each one of them so that it will be easy to understand.
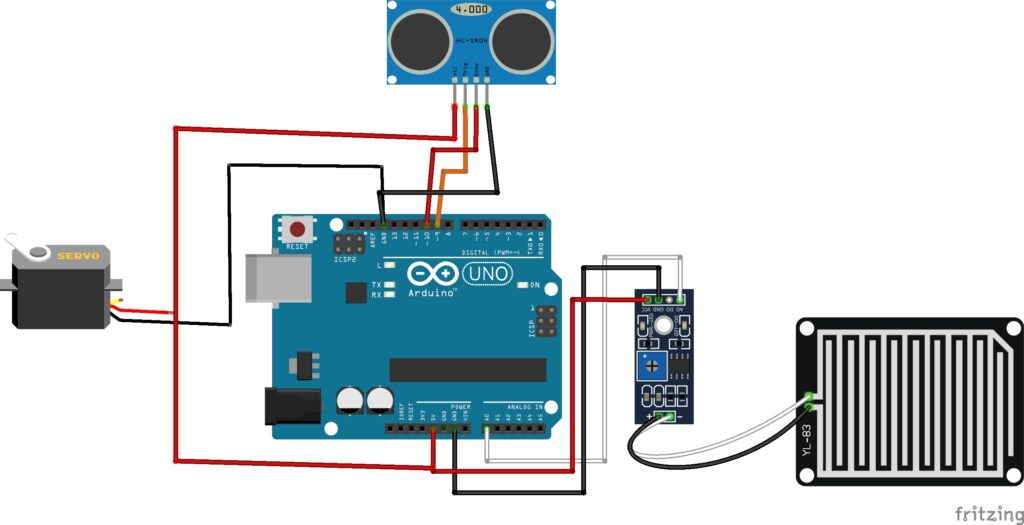
The HC-SR04 connections
Gnd and vcc are connected to ground and 5v pins of the Uno board
Trig to D9 and Echo to D10
Rain sensor module connections
The analog pin is connected to A0 wheras the power pins follows the same circuit as above component
Servo Connections
The servo signal pin to D6 on the uno board wheras the Gnd and Vcc to ground and 5v pins respectively.
ARGB LED connections
I will use a WS2812B led to indicate the colors
The signal here goes to D7 and the power connections are as above
Automatic waste segregator using Arduino code
This is the program that runs the automatic segregator project, If you are not familiar with the program just have a glance.
If you have different led count on the strip you can change that here.
I have 3 leds on the strip so in program it is 3, choose as per your count.
#include <Servo.h>
#include <Adafruit_NeoPixel.h>

#define RAIN_SENSOR A0
#define TRIG_PIN 9
#define ECHO_PIN 10
#define SERVO_PIN 6
#define LED_PIN 7
#define NUM_LEDS 3   // 3 ARGB LEDs

Servo myServo;
Adafruit_NeoPixel strip(NUM_LEDS, LED_PIN, NEO_GRB + NEO_KHZ800);

int sensorValue = 0;
int threshold = 500;  // Adjust as needed
float distance = 0;

unsigned long lastColorChange = 0;
int colorHue = 0;

void showSolidColor(int r, int g, int b);
void showBlinkColor(int r, int g, int b, int times);
void rainbowStandby();
float getDistance();

void setup() {
  Serial.begin(9600);
  pinMode(RAIN_SENSOR, INPUT);
  pinMode(TRIG_PIN, OUTPUT);
  pinMode(ECHO_PIN, INPUT);

  myServo.attach(SERVO_PIN);
  myServo.write(90);  // Neutral position

  strip.begin();
  strip.show(); // Clear LED
  delay(2000);  // Allow sensors to stabilize
}

void loop() {
  distance = getDistance();

  Serial.print("Distance: ");
  Serial.print(distance);
  Serial.print(" cm | ");

  // --- Standby Mode ---
  if (distance > 10) {
    Serial.println("Standby");
    myServo.write(90);
    rainbowStandby();
  }
  else {
    // Object detected
    Serial.println("Object Detected - Checking Wet/Dry...");
    showSolidColor(0, 0, 255); // Blue while scanning
    delay(1000);

    sensorValue = analogRead(RAIN_SENSOR);
    Serial.print("Rain Sensor Value: ");
    Serial.println(sensorValue);

    if (sensorValue < threshold) {
      // Wet Waste
      showBlinkColor(0, 255, 0, 3); // Green blink
      myServo.write(0); // Full Left
      Serial.println("Wet Waste Detected");
    } else {
      // Dry Waste
      showSolidColor(255, 0, 0); // Red
      myServo.write(180); // Full Right
      Serial.println("Dry Waste Detected");
    }

    delay(3000); // Wait for sorting
    myServo.write(90); // Return to center
  }

  delay(200);
}

// ------------------- Functions -------------------

float getDistance() {
  digitalWrite(TRIG_PIN, LOW);
  delayMicroseconds(2);
  digitalWrite(TRIG_PIN, HIGH);
  delayMicroseconds(10);
  digitalWrite(TRIG_PIN, LOW);

  long duration = pulseIn(ECHO_PIN, HIGH, 30000); // timeout 30ms
  float dist = duration * 0.0343 / 2;
  if (dist == 0 || dist > 400) dist = 400; // handle out of range
  return dist;
}

void showSolidColor(int r, int g, int b) {
  for (int i = 0; i < NUM_LEDS; i++) {
    strip.setPixelColor(i, strip.Color(r, g, b));
  }
  strip.show();
}

void showBlinkColor(int r, int g, int b, int times) {
  for (int i = 0; i < times; i++) {
    for (int j = 0; j < NUM_LEDS; j++) {
      strip.setPixelColor(j, strip.Color(r, g, b));
    }
    strip.show();
    delay(200);
    strip.clear();
    strip.show();
    delay(200);
  }
}

void rainbowStandby() {
  unsigned long currentTime = millis();
  if (currentTime - lastColorChange > 50) {
    lastColorChange = currentTime;
    colorHue += 5;
    if (colorHue > 255) colorHue = 0;
    for (int i = 0; i < NUM_LEDS; i++) {
      uint32_t color = strip.ColorHSV((colorHue + (i * 40)) * 256);
      strip.setPixelColor(i, color);
    }
    strip.show();
  }
}
You can open Arduino IDE, connect uno to programming cable and computer, paste this program in your arduino ide.
If you need any additional library when you try to upload the arduino code it gives error, Install drivers accordingly.
After you upload the arduino code to uno, the project is ready for using.
You can simply test the project by waving your hand in front of ultrasonic sensor, the servo should move to one side.
Now when you keep any wet object and wave hand in front of the Hcsr04 the servo should move to other side.
How to use automatic waste segregator project
I will assemble all the components on a piece of cardboard and for the mechanism to work properly i will use hollow cardboard rectangular box.
The servo shaft has a cardboard plate, upon this the rain sensor can be kept.
Ultrasonic sensor placement in such that when you bring any object it should pick it up.

So now you may still think how this segregator works.
When you power on the device, the servo comes to its normal default position(center).
When you place the object on the sensor, it first detects for moisture, if moisture detects and ultrasonic sensor detects the same then it falls under wet category and a green light shows up.
If the moisture is not pick up by sensor then it falls inside the dry bin and red color light appears from LED.
After every step the servo comes to its normal position.
This was all about building this wet and dry waste segregation using arduino, You may also like my previous project on music reactive led light