Arduino Maze Game DIY
Arduino Maze game DIY, This project was made Earlier using Arduino uno since then many have been asking me to make same project using nano as an outcome the project size shrinked!
Note: Many people call it as Arduino Labyrinth Game but using word maze would be much simpler! try this best arduino projects for beginners

Features of Arduino maze game project V2
Major change being usage of Arduino Nano instead of Arduino Uno Performance is same as previous project
Reduced number of wires in making circuit connection, Simple frame and Can be powered using USB whereas in previous project separate power source was used
Materials required to make Arduino maze game project
- Arduino Nano
- Joystick module few also call it as ps2 module
- Breadboard and few less jumper wires as this was main goal of upgrade
- Pieces of wires
- Plastic geared servo if cardboard maze
- Metal geared servo if plexiglass is used for board
- Double sided tape
Arduino Maze game code
Use this to paste in your IDE and later start making circuit connections, Make sure to select board type and port number in Arduino IDE, Simple circuit diagram for Arduino maze game mini version is given below
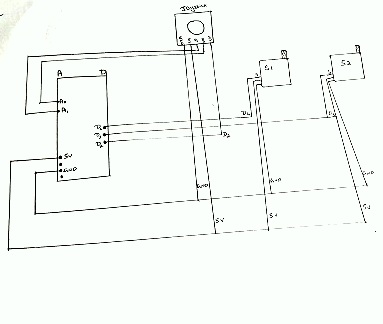
Circuit diagram Explanation
Joystick module Vrx and Vry are connect to analog pins A1 and A0
SW pin to D2 while Servo 1 and 2 are connect to D3 and D4
If connections are reversed just swap micro servo signal pins!
Gnd and 5v of all hardware components are connect to analog side Gnd and power pin of nano
Use breadboard and shorter cables to reduce number of wires and messy working environment
After the circuit is complete test the project so Just power usb power supply
If you are using 3d printed case for those Arduino project you can customize power storage slots
Further steps after circuit
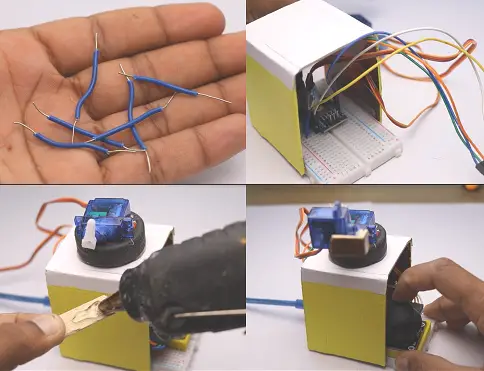
I used bent cardboard with double sided tape attached to its ends
Attach this to sides of breadboard
small case for joystick module was 3d print to make project look cooler Place all wires inside this casing
Micro servo for forward and backward movements(S1) should be glue to bottom Other servo will go into servo shaft of S1
Method to attach servo are shown in visuals above
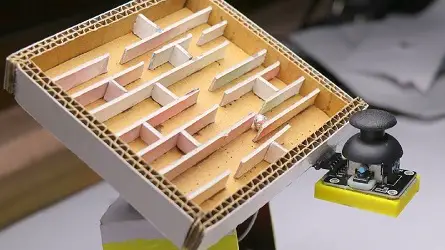
How to make Labyrinth (Maze) from cardboard
To make labyrinth as per your customization choose cardboard because of easiness to work
My dimensions were 8cm all side, Hand draw maze first and Added side supports
Protruded drawn maze using thin cardboard then used Glue for sides
Color board if necessary (optional)

After your board gets complete find its center of gravity
To do so use your finger to balance and mark its balancing point
This point should be glue to servo shafts or servo horns
Recommended to use hot glue for this purpose as this can be removed later with less difficulties
Just plug in your device and its ready to play
Video tutorial on how to make arduino labyrinth project
Watch This Arduino Maze Game DIY Tutorial also check other best arduino projects 2021
Hope you will make this project, any clarifications just share it on comment box i will help you out, Happy making have a great day.


