Homemade Automatic pencil sharpener | Easy Science Project ideas
Hello readers, wondering for new science project ideas 4th grade? or new science project ideas 5th grade then Homemade Automatic pencil Sharpener can save you!
Well, Here i will give you amazing and easy science fair idea to make Automatic pencil sharpener at home, all the steps explained very clearly so that there no room for confusions!
Features of Homemade Automatic Pencil Sharpener
Very easy to make project and best part being almost every material you can find at home
No need of rushing into nearest superstore to get all those materials, which most of us hate!
Powered by normal 6v or 12v Dc power adapter that Sharpens pencil in matter of seconds
Separate slot for after sharp waste removal overall structure is Made from recycled materials but Powerful compared to its size
Don’t worry if you missed some of materials i have provided alternatives, Continue reading below
Note: Video link of this project tutorial provided at end, Don’t forget to check it out
Materials required for this project
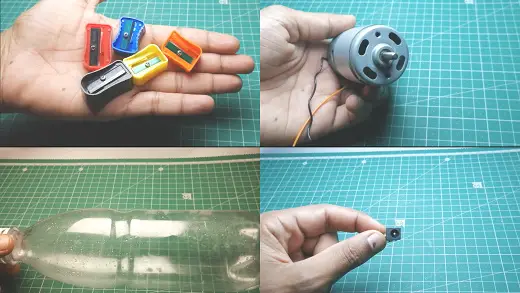
Sharpener of own color choice
DC Motor version here is 775 motor Alternatively BO Motor also any other geared motor can be used
If different motor are used requirements as need can be selected or you can apply your creativity after reading this, Definitely you will be showered with ideas!
12v DC Pin for power supply, you can use normal 9v battery also
Recycled soda bottle for making body alternatives are cardboard tubes or plastic pipes, Hot glue and super glue for coupling things
Soldering station/ soldering iron and Cap part from used color pen for shaft couplings
Once all supplies put together, refer below steps
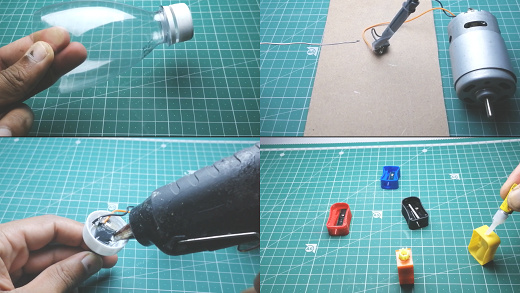
Start by soldering wire to DC Motor only do if pre-soldering is missing
Here preferred to use 775 motor which are very popular because of its silence and power comparing to cost effectiveness
Cut plastic bottle into half, we need both pieces for this project so don’t throw any away! save for later meanwhile Solder wires to 12v DC pin, this becomes our power input pin
Make a hole on cap, later place DC pin in position and using hot glue fill cap later Wait until it dries up completely
Making DC Motor couplings for sharpener
Using old color pen cap which should be same size as of DC Motor shaft Coupler can be made
Wondering what is coupler? Coupler by name says that used to couple things up!
Cut a piece of small length from cap then Attach one end of coupler to Motor shaft Other end will go to sharpener
Make sure to attach exact mid part of sharpener to avoid vibrations while working, Before super gluing to motor shaft some minor changes are made

i used cap from old plastic container as cover frame
Recommending to avoid replacement made from cardboard or paper while plastic has more strength and much preferred to use plastic
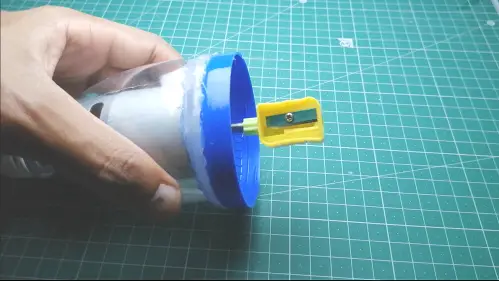
i have made a hole which perfectly fits into DC Motor body design, Attach this to mainframe using mild hot glue, if glue becomes super hot it will melt and disfigure plastic!
Once the body becomes dry use super glue for cover frame attach sharpener to motor shaft
Refer images for any references at this part our project will be almost complete
Additionally a bin for collecting all waste made from leftover plastic (mentioned previously to save for later!)
Homemade automatic pencil sharpener is ready to sharp pencils superfast!
How Homemade Automatic Pencil Sharpener works?
DC Motor converts electrical energy into mechanical energy, This mechanical energy will be converted into various forms to get required work done as per applications
Here mechanical energy will be in form of rotational energy which is exact same energy we apply while manually sharpening pencil
Since both becomes relatable wonderful project can be made using this principle
How to use Automatic pencil sharpener
- Use 12v adapter to power this project Connect power pin to power slot on motor body
- Cover the sharpener with shield so to prevent waste from spilling out
- connect power adapter to power supply and switch it on Motor starts working so the sharpener begins to spin
- Insert pencil to sharpener via shield Pencil will sharp in matter of seconds
- Waste gets collected inside shield, so it can be safely transferred to dustbin
- Don’t keep pencil inside sharpener for too long because of high RPM, hence in no time work gets done
- As i observed in 4 seconds you can sharp a new pencil if same process was done manually 15 to 20 seconds would be consumes
- Congratulate me for saving your 15 second time and valuable physical energy
Advantages
Can be good creative idea for science fair projects or mini projects
Project gets done within an hour if all materials were put together which Eliminates repetitive task
solar panel can power this project hence This is a device which runs from free energy sources!
Less expensive (overall cost is less than 5$), Leads to much more innovative ideas using DC Motor
Disadvantages
Switch and speed controller can be added for much more precise speed control as having much more unused energy more than required
Better frame materials usage but that can lead to increase in overall cost of project
Small motor doesn’t have enough power to run sharpener with load, System doesn’t fit in pocket
Consumes more energy when load applied
That was all about building Homemade Automatic pencil sharpener, i hope all steps were clearly explained so that if you are building no confusions occur, if you have any let me know in comments Section.
Additionally i have provided video link for this project
Video instructions
Check here for Automatic pencil sharpener making tutorials
Also Don’t forget to check out my other posts related to building various other exciting science projects as well as Arduino projects, Go to menu section and get your dose for creativity!
Requesting you to show you support for this project by sharing this awesome ideas with your family and needy friends, help me in sharing such educational content across the globe, Thank you and have a good day! see you in upcoming creative project idea
