Easy IOT Project – How To Make Smartphone Controlled Wi-Fi Rover
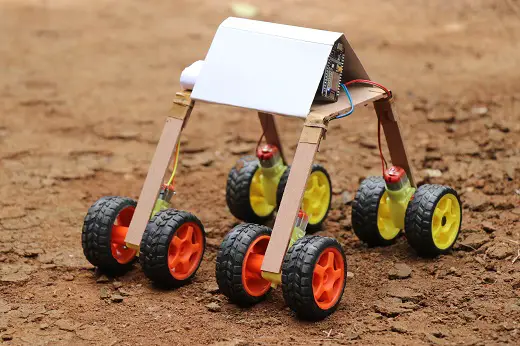
In this project i will Tutor How to Make 8 wheeled Rover which can also be known as Robot Car which is very powerful according to its size.
This is completely on control by Smartphone and all wheels can be individually moven so that it can go in all the directions.
It can glide smoothly in almost every terrain, If you were looking for Mini Projects for Engineering, IOT Project or for Best Arduino Project ideas this is an perfect project idea for you.
Note: i have Provided Video Link at The End
What is Rover?
A Mechatronics Wonder which is enables to explore places which is unexplored, these are mostly used in space exploration(inhabited planets), the reason for not exploring might be due to risk factors/threats posed to humans.
Using these rovers which is controlled remotely that can go to almost all type of terrains which are unsafe to humans, well these criteria’s are for actual big size Space exploration rovers, now let’s talk about the rovers which we are going to build.
Specifications of Rover Which We are going to Build
Using Gear reduction motors which reduce RPM of DC Motors and also increase torque, which is very much essential quality for rover
Four dual shaft DC MOTORS with wheels attached to both sides ensuring the torque of motors are utilized
Controlled by smartphone good IOT Project, Decent run time
Built on a budget and Perfect for Budding Mechatronics Engineers
Materials Required

L298N Motor Driver, Node MCU (ESP8266) for IOT projects
Set of 4 wheels and Jumper wires for connection making along with Dual Shaft geared DC motors (4 pieces) also called as double shaft DC Motors
MDF Wood can use Plexiglas too, Super glue/hot glue and Rechargeable battery I use lithium ion battery as it gives decent backup time
Let’s start with Building Wheel Base
Please follow sequence as shown in image or follow steps below both are one and the same!
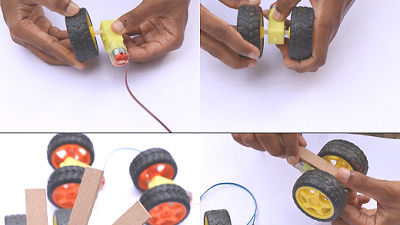
Attach wheels to both sides of dual shaft geared dc motors
Cut MDF wood strips of length(15cm*1.5cm), Using superglue attach wood strips to body of dc motor
Cut small pieces which are use to improve strength of side joints, Stick to frame as in images, Join all the four wheel holder strips to roof(rectangular MDF)
So at the end our main body is ready, but we have to add brain which is very important. Now let’s head onto uploading codes to our Node MCU

UPLOADING CODES
Steps to Upload code to ESP8266
Open arduino IDE (integrated development environment) Software, Don’t have Arduino IDE Installed on your computer ? Just get it from arduino.org it’s free!
Use Micro USB cable to connect ESP8266 to Computer Open the IDE/software, Make sure to select the right type of board
To check the type of board which is selected goto menu …tools..board..bottom u can find ESP8266 ..Select it
If you are unable to see those options make sure you have installed ESP8266 wifi driver in your arduino library
Don’t have Library installed? Just google search ESP8266 wifi library on google and download it
To add downloaded library, Goto menu..sketch..include library..add .zip library..choose your specified downloaded location and click on ok
Check for port number, if it’s not select by default click on available ports section from menu then tools later port-Copy paste the code given Click on upload
It takes some time for the code to get upload if you are setting all this up for the first time, After the code is done uploading disconnect USB cable
CODES FOR YOUR ROVER
Short Tip: To check if your code is working fine just connect the board to USB Power source
So that you can notice 2 things
1)You will find lights on in the board
2) Switch on Wi-Fi in your phone you should be able to see your Wi-Fi name(ROVER) listed!
Now let’s Build Circuit
To build circuit for this IOT Project please follow circuit diagram as shown below, to make it even more easier I have added Explanation steps also
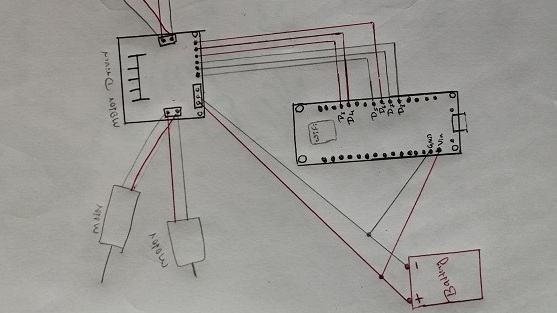
Pin Connections
- ENA to D5
- IN1 to D7
- IN2 to D8
- IN3 to D3
- IN4 to D4
- ENB to D6
- Output 1 and output 2 from motor driver to DC Motors(check for red and black wires in above diagram)
- Same with Driver’s Output 3 and 4
Once the circuit is complete we can proceed with Battery connections
Common wire for positive power supply from battery to Vin of Node mcu as well as for +5v terminal of motor driver shield
Common wire for Negative power supply from battery to gnd of node mcu along with gnd of L298N Shield
Add common switch between battery and nodemcu, driver so that the device can be shut down when not in use
Use Rechargeable Lithium polymer batteries as those type of batteries give larger backup time, With sufficient supply for this project.
Once this is ready we shall proceed to
Build main frame
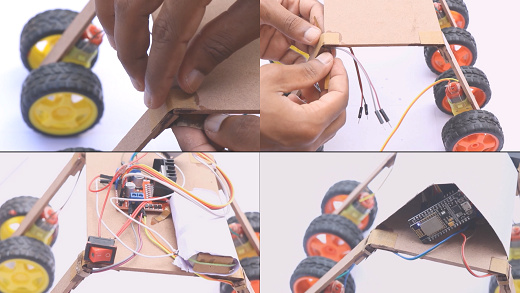
Connect the wheels to top roof using pieces of carboard strips glued on both the sides(upper and lower) the purpose of using superglue is it gives immense strength but the major drawback is it leaves out stains!
Once frame is built connect the wires from motor to L298N shield later Cover the circuit to protect it when it goes outdoors! (From sun)
How to use?
Switch on the device(Rover) then Open Wi-Fi in your smartphone
Wi-Fi name will be shown as given in the code(I have set as MY ROVER)-Connect to Wi-Fi- Open Node MCU car application in your smartphone/tablet
If you don’t have the application just download from play store Wait for connection, Now you can control the movements of car using application and the range is as per the Wi-Fi
IOT Project is ready for use
VIDEO LINK
watch stunts from this rover
Additionally if an Wi-Fi camera is added to this rover live video can be stream and as a result this robot can be sent to places for exploration while you can sit and control your Rover from your couch!
That was all about this rover/ IOT Project hope you are clear with all the building instructions.
If you have any doubts/queries in any step please let me know in the comments section. Also if u have any ideas for upgrading this robot let me know, Thanks.


