How To Make Arduino Piggy Bank
Piggy bank is familiar word to many but Arduino piggy bank may seem quite new to few people , well it’s nothing but Arduino version of piggy bank that means we use Arduino to control deposit and withdrawal of our saved stacks of money! if you are looking for best Arduino projects 2021 this can be one since it falls under useful arduino projects
Arduino code for piggy bank along with video link is given below, well for now let’s start with new arduino projects 2021
What is Arduino piggy bank
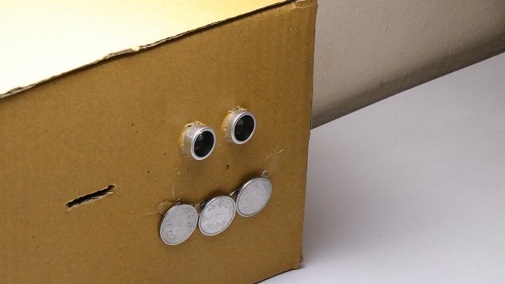
Many might have wondering how does our project look, so this is actual image of project.

Features of Arduino Piggy Bank
- Can Collect several hundreds of coins
- Piggy bank locks automatically when not in use
- slot can be made open for inserting coin by simply waving at sensor
- Uses less power
- Can’t steal money!
That was some of basic features of our mini bank which we are going to build, now let’s gather supplies required to build this useful Arduino project
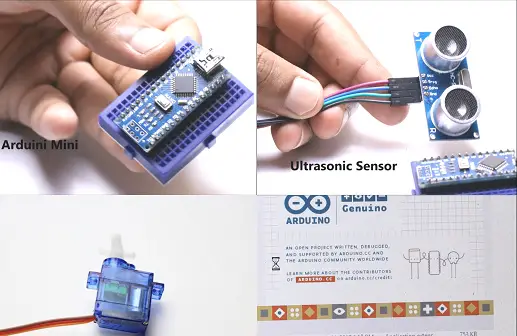
Arduino Nano alternatively you can use Arduino UNO but Nano takes less space
Ultrasonic Distance sensor HC-SR04
Micro servo plastic geared works fine for this project
Cardboard or plastic body, size depending on how much money you are willing to feed!
Breadboard if you are using nano and Few jumper wires and external power source
I use Rechargeable battery, Hot glue for coupling
| Part name | Buy in India | Buy in USA |
| Arduino Nano | https://amzn.to/3pH1O0A | https://amzn.to/2NJkBLI |
| Arduino UNO | https://amzn.to/3kbjZL2 | https://amzn.to/3buKSoW |
| HC-SR04 Sensor | https://amzn.to/3qFwf8J | https://amzn.to/2NjCLUw |
Disclosure: These are affiliate links. As an Amazon Associate I earn some credits from qualifying purchases.
Gather all the supplies first, Later open Arduino IDE on your computer, Copy paste this code and Upload to your Arduino Nano, If you are using Uno make changes in pin in code.
Arduino Code for Piggy Bank
Video Link
Watch full video Here to see how this piggy bank works
Once you upload the code disconnect power cable from board and follow below circuit diagram to make Circuit connections
Circuit Diagram
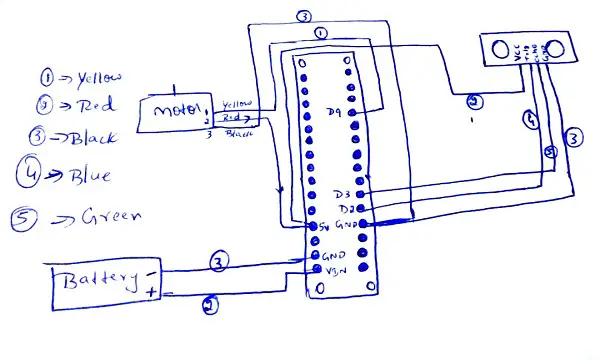
Circuit Diagram Explanation
Signal pin of micro servo goes to D9(or any other pin make changes in code)
Positive and negative of servo goes to 5v pin and Gnd pin of board
Vcc and Gnd should go to 5v and gnd respectively
Trig to D2 and Echo to D3 u can give digital pin number as per your choice make sure you make changes in code
In the head part of code you can see trig and echo commands followed by pin number if you want to make any alterations those are areas
Once you make all the connections of electronic components as per the above mentioned diagram test out the circuit by giving external DC power supply
When you wave hand near Sensor servo motor shaft should make movements, if it does we are good to go
Frame and finishing project
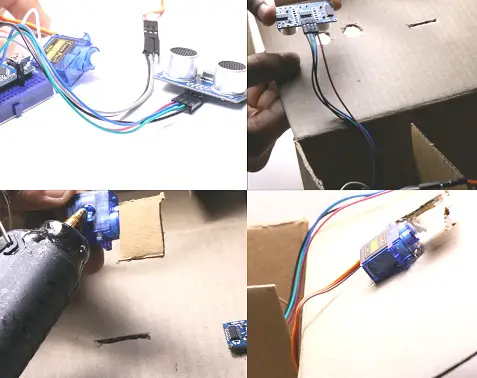
Once the circuit is built completely and tested we need to make Casing for our piggy bank
Since we are using electronics we need separate chambers for collecting money and to place all electronic components
Make sure the space for electronics is small , Since i made using nano only small place was sufficient
Once all the components are placed stick to frame using hot glue or gum tape
Mechanism for piggy bank
Here the mechanism is very simple
Make hole on cardboard where u will drop the coins
Size of hole depends on which country you live in as coins size varies accordingly
Make sure it’s near to sensor , By default the servo will be in its rest position
Stick a small piece of cardboard to shaft of servo motor Now stick servo motor to previously made hole using hot glue
One important thing to be taken care here is make sure the servo shaft swings within the given area, if u have any overlapping issues with cardboard reduce angle of rotation of servo in code
Test out if everything works fine before sealing everything
Connect wire and switch if necessary to outside box so that bpower supply is from outside
Once above said are made seal the piggy bank box using hot glue which i prefer
Here the coins once inserted can’t be taken unless you open the box entirely in short you can open the box when the box is full!
How to use Arduino piggy bank
From above instructions many might have got idea how it works but few might still left with confusions
- Switch on power supply from battery
- Place coin on slot which you want to save for future
- Wave or just get your hand near the ultrasonic sensor
- Servo makes small rotation which means your coin falls into bank
- Here the concept is cardboard piece attached to servo motor shaft acts as barrier
- Save your money!
Hope that was clear instructions on how to make Arduino piggy bank, if you are making this project and need any help which you think i have not included here let me know in the comment section, Make sure to check out older posts related to Science and Arduino Projects, Thank you 🙂

