Make LPG Leakage Detection System with real time Air Quality Monitoring
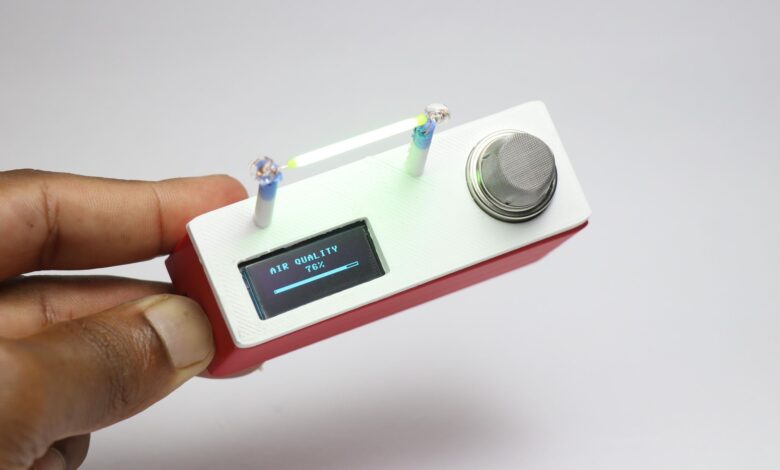
Hello people in this article i will show you how to Make LPG Leakage Detection System with real time Air Quality Monitoring using the raspberry pi pico board.
Have you ever wodered what might be the quality of air that you might be breathing right now at your room.
Most of us simply ignore this topic and never mind about the quality of air.
But this needs to be considered with priority since it is the basic need and everyone deserves to breathe good quality air.
Also if you are going to build some project related to electronics and tend to use soldering iron.
The smoke from that is also harmful, Did you know this?
So i came up with this 2 in 1 device that serves 2 purpose at once.
This can work as a real time air quality monitor and also detect lpg leakage and alert you.
The indicator which im using here is not an ordinary LED its an Edison LED filament.
If the gas level exceeds the limit or the air quality is bad the LED blinks thus alerting the user.
Materials Required to Make LPG Leakage Detection System
Raspberry Pi Pico
OLED module 128×64
Edison LED
MQ135 Sensor Module
Thonny IDE
Jumper Wires
PLA Filament and 3D Printer
Glue
Circuit Diagram For LPG Leakage Detection System
This is the circuit that we are going to use for this project and i will explain to you in more simple way.
There are total 3 components that we will be using apart from the raspberry pi pico itself.

MQ135 sensor connections
It has 3 pins, i will connect the power pins to Vbus and gnd on the board.
The analog pin a0 is connect to Gp26 also called as analog pin on the pico.
Sda and Scl to gp4 and gp5 pins whereas the power pins again is connected to Vbus and Ground.
Edison led here i have used the regular led as a reference since i was not able to find the same part.
Positive pin is connect to 3.3v whereas the negative is connected to the GP16.
The connections are pretty much simple.
Connect the ground of all the components to the ground of Pico for easy building process.
If you want to make this device more smaller you can use PCB and i would suggest JLCPCB
They have fast shipping with more affordable options, and now they have JLCONE which makes everything pretty much easier.
JLCONE is a application that is available for both desktop and mobile and you can manage your orders and other services in a single platform.

Try it and you will definitely love it.
Python Program for LPG Leakage Detection System with real time Air Quality Monitoring
I will be using this python program to run the controller and its sensors.
Here i have added all the ui features inside this program so basically you can use this in your project.
from machine import Pin, ADC, I2C, PWM
import ssd1306
import time

# ======================
# OLED SETUP
# ======================
i2c = I2C(0, scl=Pin(5), sda=Pin(4))
oled = ssd1306.SSD1306_I2C(128, 32, i2c)

# ======================
# HARDWARE
# ======================
gas_sensor = ADC(26)
motor = Pin(15, Pin.OUT)

led = PWM(Pin(16))
led.freq(1000)

# ======================
# SENSOR
# ======================
smoothed = 0

def read_gas():
    global smoothed
    raw = gas_sensor.read_u16()

    gas = int((raw - 10000) / 50000 * 100)
    gas = max(0, min(100, gas))

    smoothed = int(smoothed * 0.9 + gas * 0.1)
    return smoothed

# ======================
# LED CONTROL
# ======================
def led_off():
    led.duty_u16(0)

def led_on():
    led.duty_u16(65535)

# FAST BLINK (NON-BLOCKING)
blink_state = False
last_blink = time.ticks_ms()

def handle_led(gas):
    global blink_state, last_blink

    if gas > 70:
        # ⚡ FAST BLINK (every 60ms)
        if time.ticks_diff(time.ticks_ms(), last_blink) > 60:
            blink_state = not blink_state
            last_blink = time.ticks_ms()

        if blink_state:
            led_on()
        else:
            led_off()
    else:
        led_off()

# ======================
# LOADING BAR
# ======================
def loading_bar(text):
    oled.fill(0)
    oled.text(text, 10, 10)
    oled.show()

    for i in range(0, 128, 4):
        oled.fill_rect(0, 25, i, 4, 1)
        oled.show()
        time.sleep(0.01)

# ======================
# AIR SCREEN
# ======================
def air_screen(gas):
    for _ in range(20):  # stay longer + smooth refresh
        handle_led(gas)

        oled.fill(0)
        oled.text("AIR QUALITY", 14, 0)

        # centered value
        val = str(gas) + "%"
        oled.text(val, int((128 - len(val)*6)/2), 12)

        # bar
        width = int(gas * 1.2)
        oled.rect(10, 26, 108, 4, 1)
        oled.fill_rect(12, 27, width, 2, 1)

        oled.show()
        time.sleep(0.05)

# ======================
# GAS SCREEN
# ======================
def gas_screen(gas):
    for _ in range(20):  # smooth + slower
        handle_led(gas)

        oled.fill(0)
        oled.text("LPG STATUS", 20, 0)

        if gas > 70:
            status = "LEAK!"
            motor.value(1)
        else:
            status = "SAFE"
            motor.value(0)

        oled.text(status, int((128 - len(status)*6)/2), 14)

        # animated bar
        width = int(gas * 1.2)
        oled.rect(10, 26, 108, 4, 1)
        oled.fill_rect(12, 27, width, 2, 1)

        oled.show()
        time.sleep(0.05)

# ======================
# BOOT SEQUENCE
# ======================
def boot():
    loading_bar("Starting...")
    loading_bar("Sensors Init...")
    loading_bar("Ready!")

# ======================
# MAIN
# ======================
boot()

while True:
    gas = read_gas()

    air_screen(gas)
    gas_screen(gas)
Use thonny IDE to upload this python code inside your pico.
Dont have thonny? Get it for free here since its an opensource platform.
After you download and install, use this program.
Now connect usb to computer and before connecting the cable to pico just press the bootsel button and connect.
You will get a pop up, now in your thonny go to menu, options and manage select interpreter.
Select port and click install python, now save the program in your pico under the name main.py.
Now you have the board ready for using, test the project.
Assembling steps
I will be using the 3d printed part to case the electronics and you can do the same too.
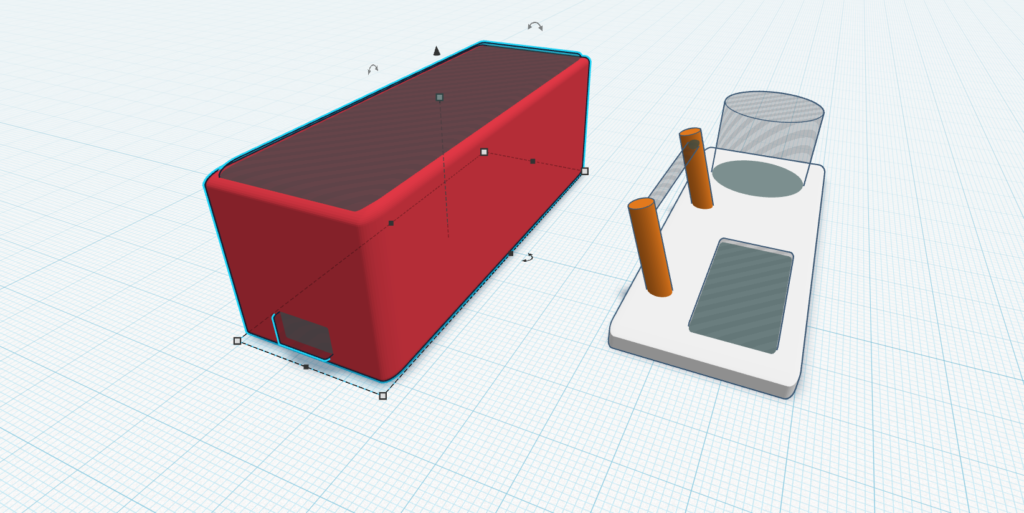
Place the electronics inside the case and connect the base with the lid and now the project is ready.
How to use?
Using this is like plug and play devices, all you have to do is connect to some usb source and you are ready to use this.
I will use gas from lighter to test this and it works very well, whenever the gas level exceeds 70 percent the light will blink indicating the leakage.
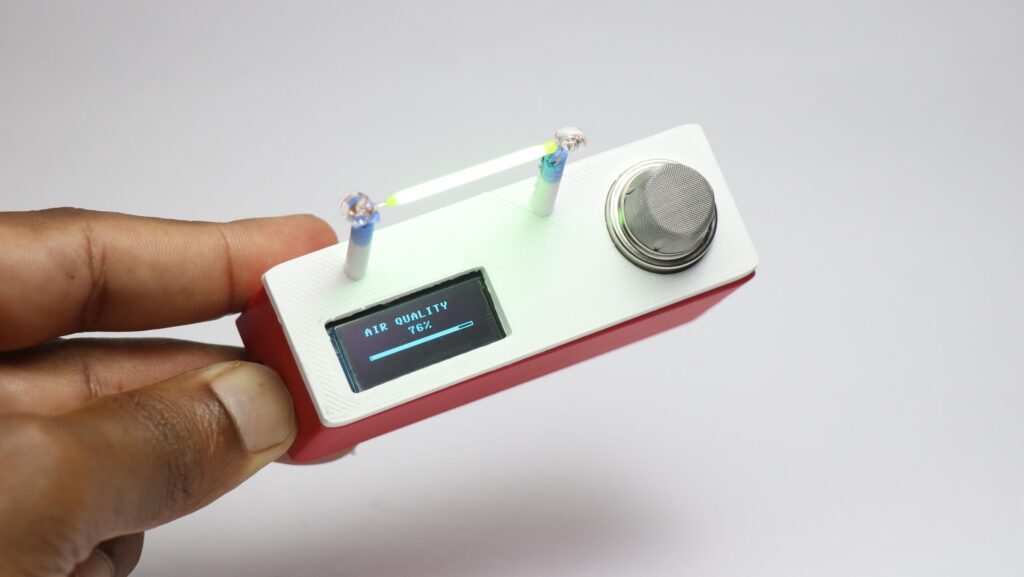
All the components are powered by pico board itself and i had no issues in the performance.
This was all about make LPG leakage detection system, if you have any suggestions let me know.
Thanks and you can check this build tutorial video of this project.