Temperature and Humidity Measurement using Arduino and DHT11
Hi Readers in this project we will learn temperature and humidity measurement using Arduino with stepwise building instructions as we know you are in search of mini engineering projects.
Every Project becomes easy when the circuit diagram and Arduino codes are well explained and we have done that for you in this article.
You can follow all the steps and finish a successful working project with the least amount of time.
Apart from building this project, you can also learn the working principles of DHT11 and an OLED display.
Note: If you don’t have Arduino Nano don’t worry I have provided a circuit diagram and codes for Arduino Uno too, Don’t miss to check it out.
You may also like our Previous LED Chaser Project.
What is Arduino Temperature and Humidity monitoring system
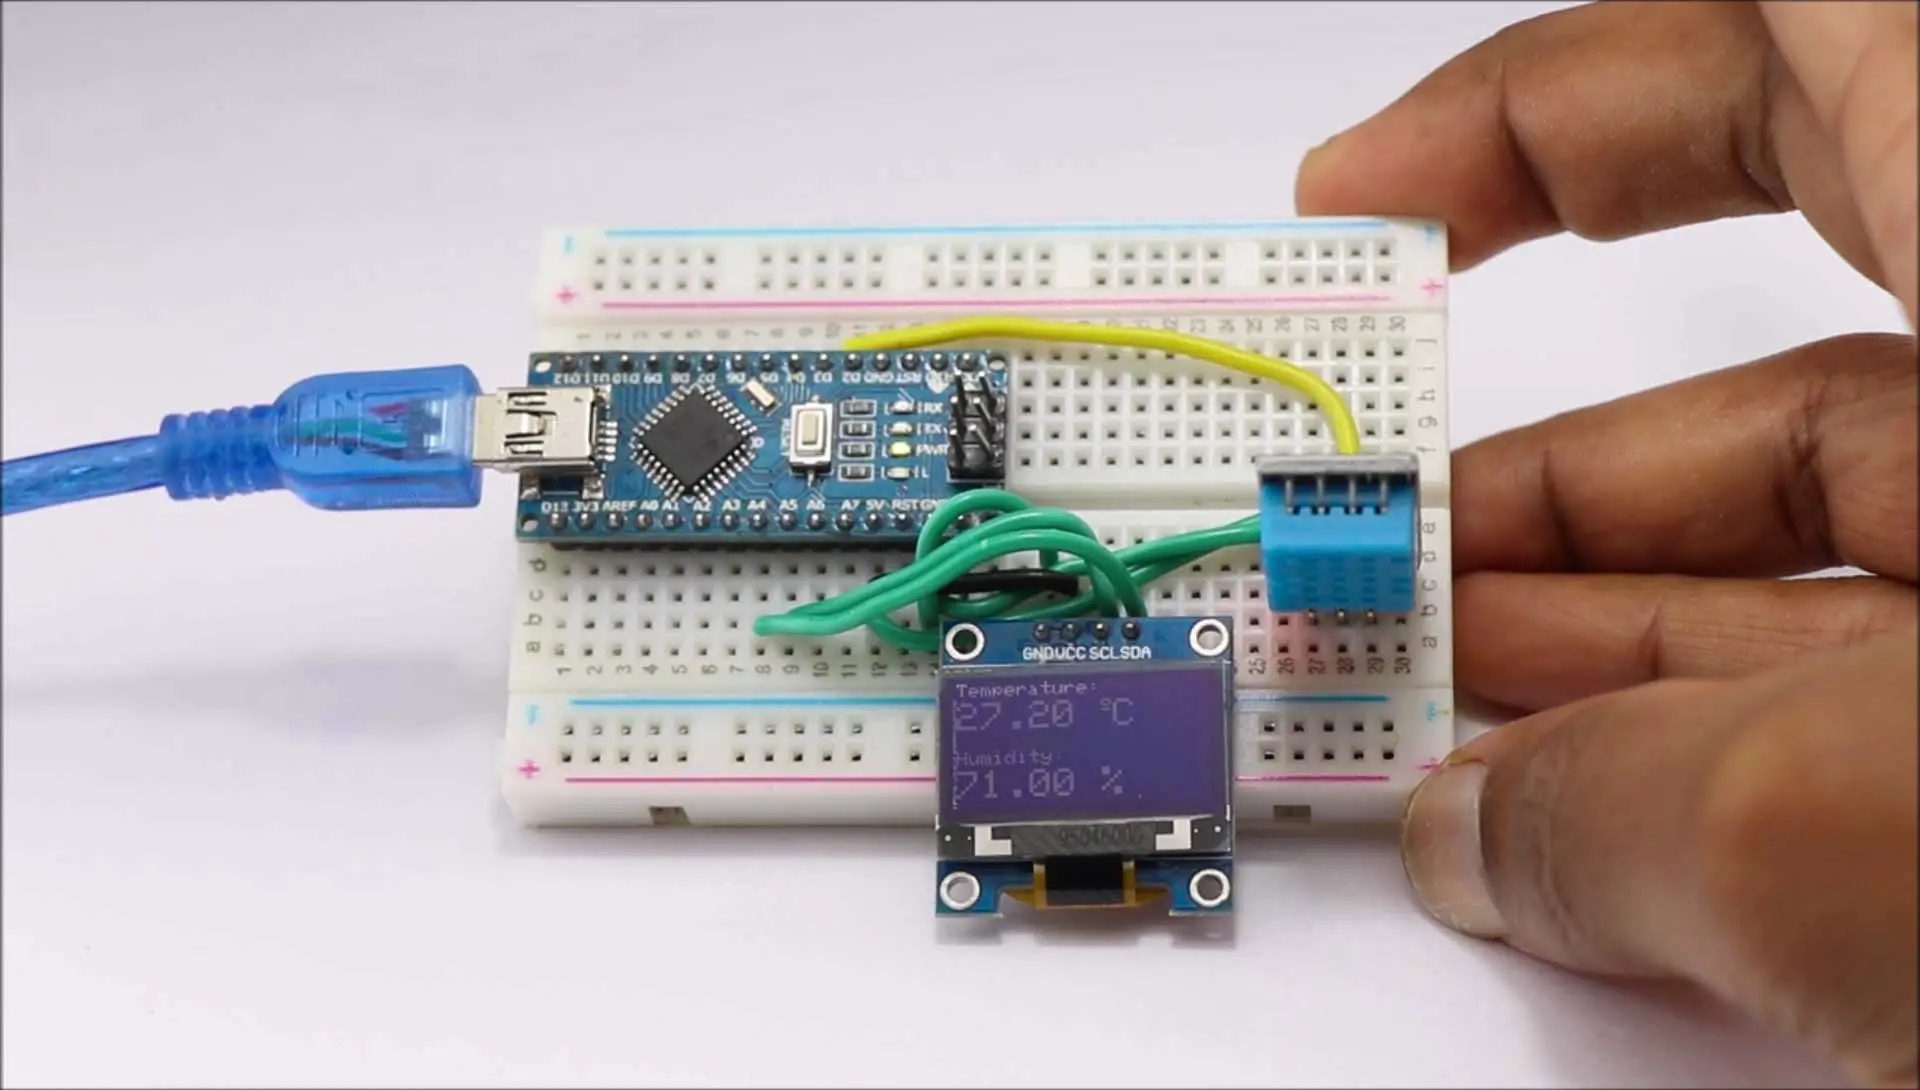
This is an instrument that gives out values immediately when it is given power in short, a plug and play type of device.
I can say an inexpensive system to measure temperature and humidity that you can build at home and can check all the real time data without any internet connectivity.
There is a great advantage from our project when compared to iot based temperature monitoring system using Arduino because that needs an internet connection to transmit the data
Our Project does not need an Internet connection but can display the values of humidity and temperature with utmost accuracy.
This is a portable device as we are using Arduino Nano which is known for its small compact size.
To begin with, let’s see the list of supplies to build this.
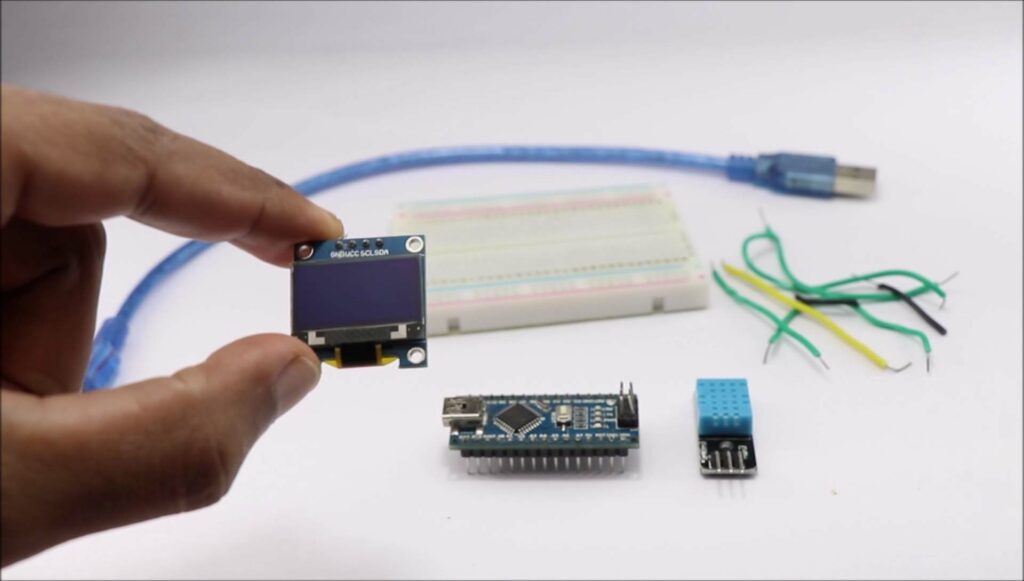
Materials
Arduino Nano or Uno board
DHT11 sensor and OLED display
Small breadboard and single strand wires
Arduino cable and IDE
These are the materials to build this, I have given visuals for the same below for better understanding.
Once we have all these parts on the table we can start to build the circuit.
Arduino Temperature and Humidity Measurement Circuit Diagram
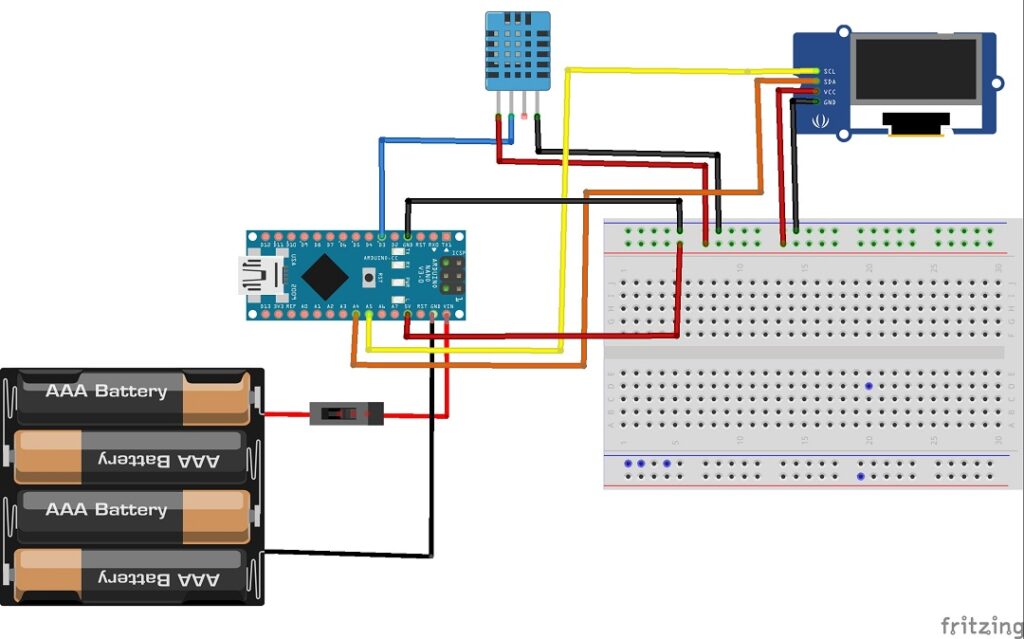
If you are using nano this is the circuit.
This is the circuit we are going to build for this project and it is very easy too.
For better understanding, I will explain this circuit if you don’t know how to read the circuit.
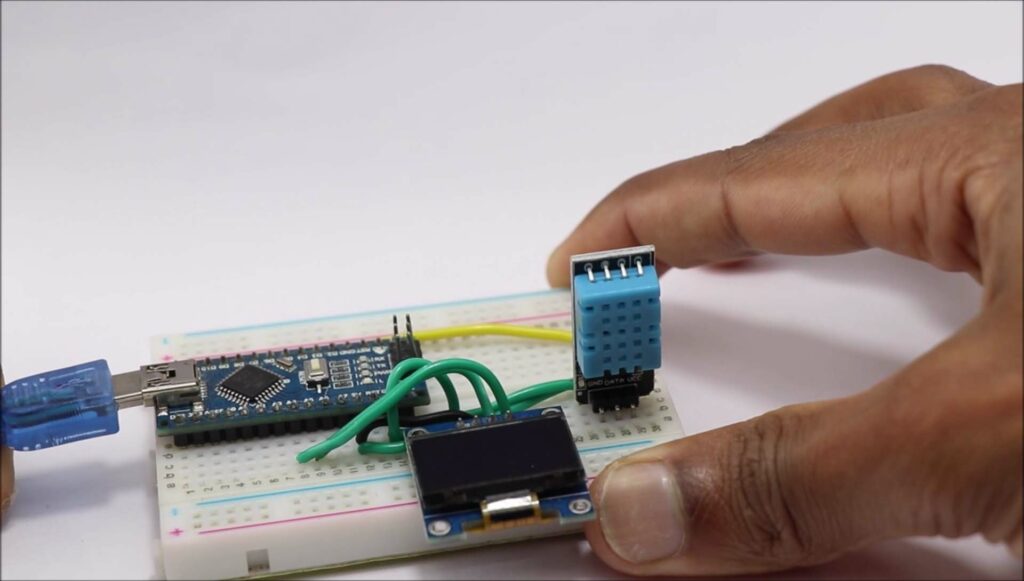
DHT11 Sensor Interfacing with Arduino Uno
There are 4 set of pins on this sensor out of which we are using 3 pins on our project.
Some sensor comes with 3 set of pins, Gnd, data and Vcc and we need only those.
2 pins will be for positive and negative power supply, whereas data will be for signal.
We will connect the D3 pin with data pin of the DHT11.
Now you may be wondering how this sensor works
For the humidity and temperature measurement, it has 2 separate elements.
We get Humidity when electrical resistance is observed between 2 electrodes whereas for temperature we have an NTC temperature onboard.
To display these values we need a device hence we are using an OLED display for this purpose.
OLED Display Arduino Connection
This is an 0.96inch OLED display with 4 different sets of pins.
Scl, Sda, Vcc and Gnd, out of which Vcc and Gnd are for power supply.
The remaining 2 pins are for signal input and output.
Scl or serial clock is connect to A5 pin on Nano whereas Sda for A4 pin on board.
To make the circuit easier I will be connecting power pins to power rails on the breadboard.
For the supply from board we are connecting 5v and gnd pins from Uno to Breadboard rails
This completes the circuitry, now we can make connections for the same
The final circuit looks like this, now we can upload the programs to make this work.
DHT11 Temperature and Humidity sensor Arduino Code
You can use these Arduino codes inside your IDE and upload them to your Nano or Uno board.
Before hitting the upload button make sure to cross-check these things.
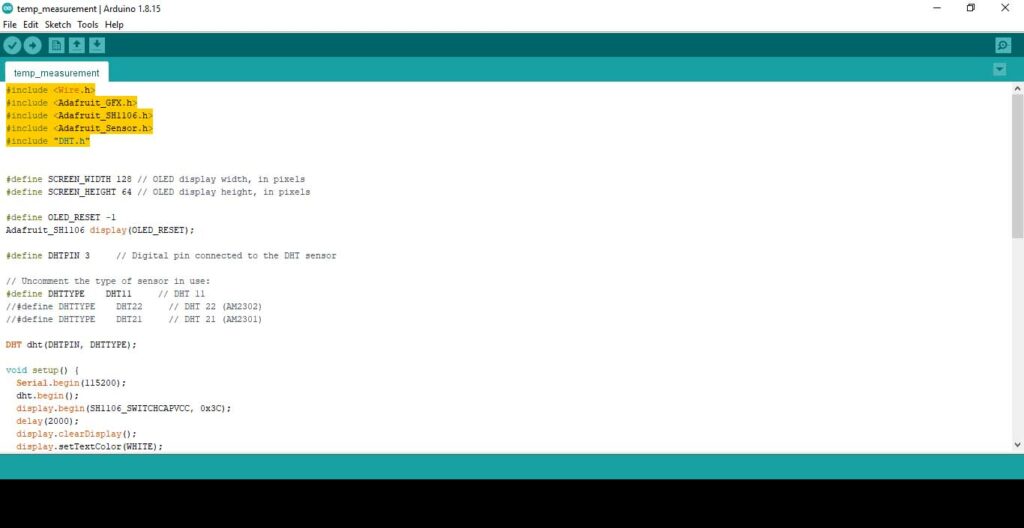
If you don’t have a pre-installed library for adafruit get it from here.
Adafruit sh1106 library and Adafruit gfx library
Once you install the zip version of these libraries just go to sketch menu then include library later include.zip library.
Extract these files, now once you have these on your library you can upload the codes to board.
If you face any issues while uploading try to upload using Old bootloader, for this just go to tools then select processor there you can choose old bootloader.
This definitely solves your problem, After the uploading is complete Project is ready to use.
How to use Power Arduino board using USB or External Power Supply
- OLED display lights up and starts to show some values, wait for some time to get the accurate readings
- You can cross check the values with your smartphone by selecting your region
- This works pretty well in most of the environments
- That was all about Temperature and humidity measurement using Arduino, if you have any questions let us know
Circuit Diagram for Monitoring Temperature and Humidity using Arduino Uno
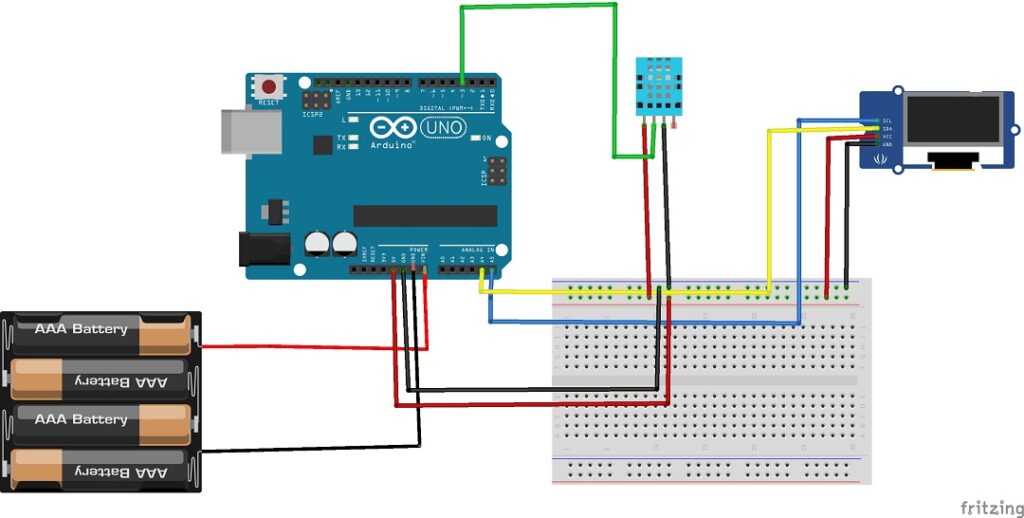
If you do not have Nano instead have uno you can use this circuit whereas the program remains the same.
Hope you found this Temperature and humidity sensor Arduino project useful.
Working video of DHT11 Temperature and Humidity Measurement
Don’t miss to check this awesome video that includes tutorials along with working on this project.
You may also like our previous post on working on machine learning


